


Meta pixel previously Facebook pixel has a lot of website integration techniques. Among those, are easy methods provided by Meta. But, they usually have a lot of errors. Sometimes you won’t be able to figure out where they occur, or how your users’ actions data got duplicated.
To avoid configuration mess-ups, I would always recommend integrating Facebook pixel manually through Google Tag Manager.
Google Tag Manager Facebook pixel integration will give your Facebook conversion ads performance a boost and will set the foundation for your remarketing ads.
Table of content
- What is a Facebook Pixel (Meta Pixel)
- What is Google Tag Manager
- What does a Facebook Pixel code consist of
- Add a Facebook Pixel code to Google Tag Manager Manually
- Create your GTM Container
- Create your Facebook Pixel
- Copy The Facebook Pixel base code
- Create your FB Base Tag configuration on GTM
- Set up Facebook Pixel helper
- Setup Google Tag Assistant
- Test your Facebook Pixel Tag
- Set up Facebook Pixel standard events
- What is a GTM Data Layer?
- Review Data Layer In GTM Tag assistant
- Create a Purchase Trigger
- Creating Required Variables
- Building our First FB standard event Tag
- Adding Standard Event Trigger to Purchase Tag
- Publishing your GTM Container
- Extra Tips
- Benefits of Integrating Facebook Pixel with Google Tag Manager Manually
First, Let’s take a look at What a Meta Pixel is.
Meta pixel is a piece of JavaScript code that must be integrated into the header section of all your website pages, so it can track events taken by your website visitors.
There are two types of events that can be tracked with a Meta pixel, standard and custom events.
Facebook events are necessary for conversion tracking and your Facebook conversion campaigns wouldn’t work, if you don’t have them set up.
1- Standard Events
Standard events are the set of events that are usually the same between most websites. They usually are common in most use cases. For example, if you visit any e-commerce website, you will start by browsing a number of pages (PageView).
Afterward, if any product captured your attention, you will most likely view that product page (ViewContent). Now you liked what the product page had to say, and you decided to add the product to the cart (AddToCart). Finally, it’s time to add up your checkout details (InitiateCheckout) and confirm your payment (Purchase).
2- Custom Events
Custom events are not usually common among most websites. They are somehow unique to the purpose of each website.
For example, if you are running a blog website and you want to receive a conversion event every time a user spends 5 minutes on your website, you will set up a custom event to track that specific behavior.
What is Google Tag Manager (GTM)?
Google tag manager is a powerful tool developed by google that will help you manage all your marketing tags in one place without the need to wait for a developer
Google tag manager uses predefined tag configuration elements for Google Analytics, Google ads, and other third parties. However, Facebook is considered a top competitor for Google, and that’s why Google doesn’t provide predefined tags for integrating the meta pixel.
There are three methods to set up Facebook pixel using Google Tag Manager.
The automated method
The Integration Method
The Manual way
In this article, we are going to cover the manual way to Integration
What does a Facebook Pixel code consist of?
Facebook pixel code consists of two essential parts, which you would have to inject in the GTM container
Base pixel code and event codes.
The Facebook pixel base code is the part given to you by Meta pixel and you will be asked by Meta to include between the opening and closing header tags of all your website pages.
Event codes are manually constructed from your side based on the events and parameters that you want to track for each event.
Add Facebook Pixel Code To Google Tag Manager Manually
Create your Google Tag Manager container
First, please follow the Google Tag Manager account creation guide in order to create a new Google Tag Manager account and website container.
Create your first Facebook pixel
Then go to the Meta Business Manager and navigate to the Events Manager from the left-hand side Menu.
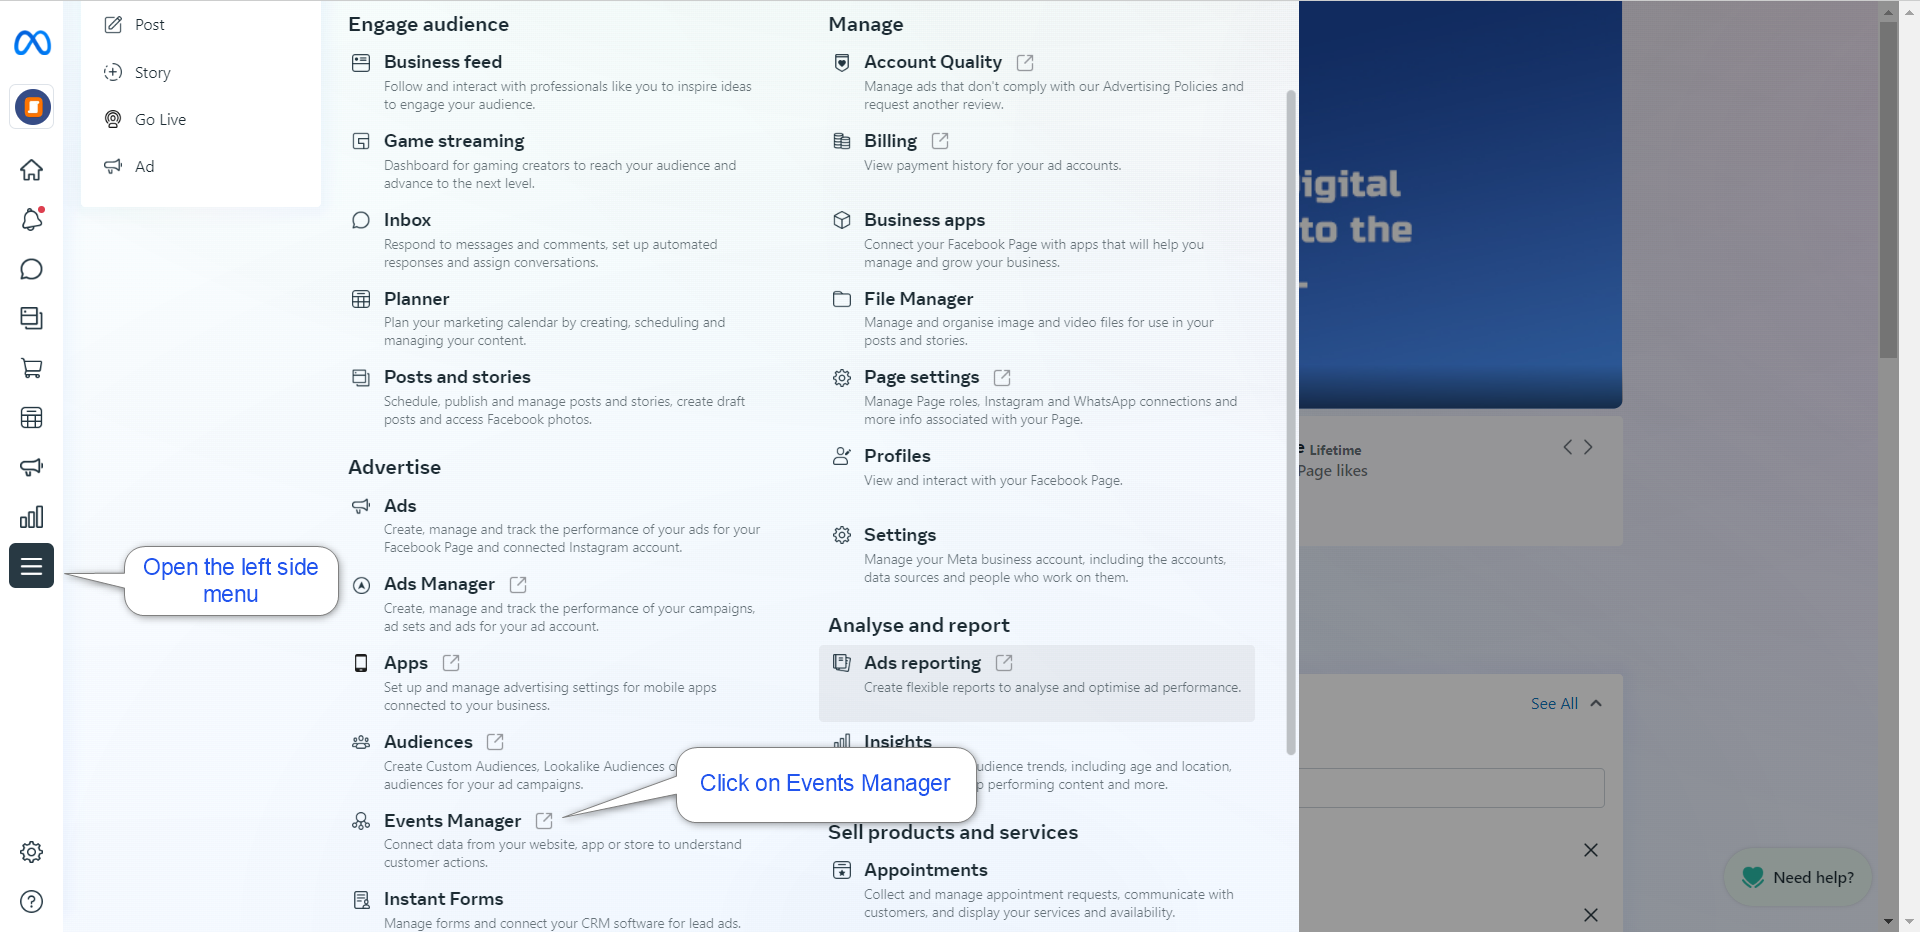
To start, you will have to open Facebook Business Suite on your desktop browser.
Then click on the hamburger menu on the left-hand side to expand the side menu and choose Events Manager from among the listed tools.
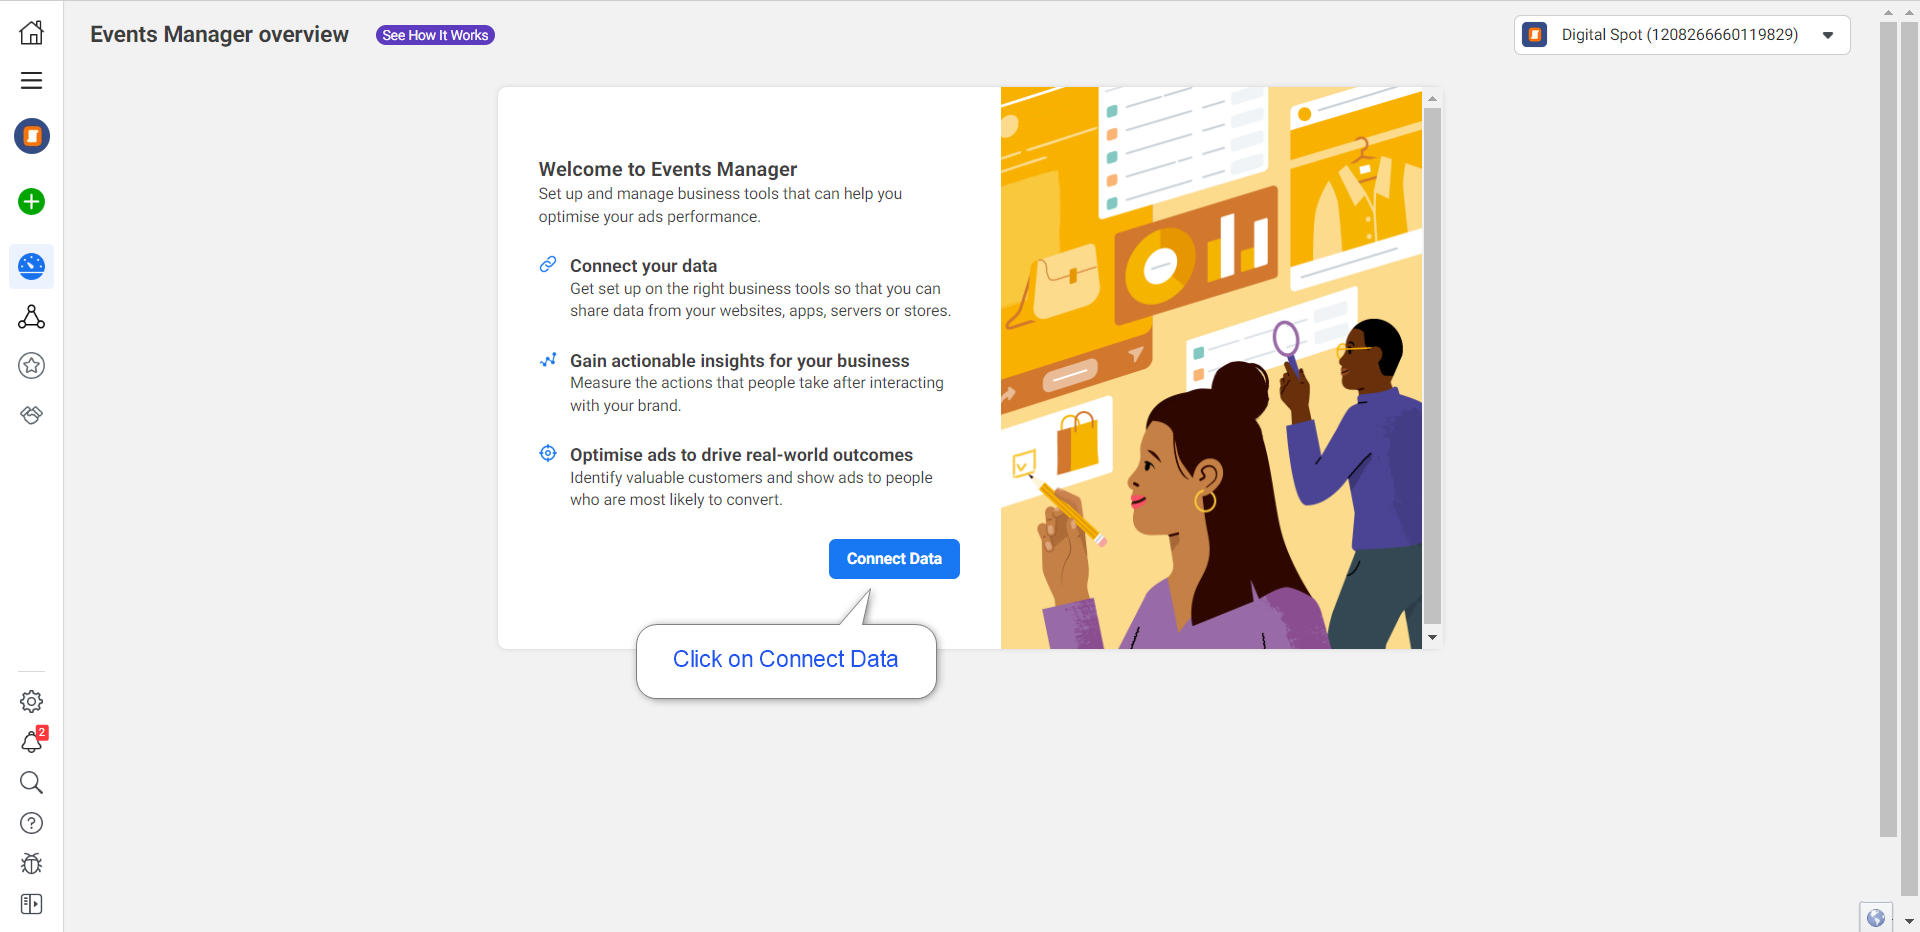
Then you will click the button reading “Connect Data” to start Setting up your Facebook pixel.
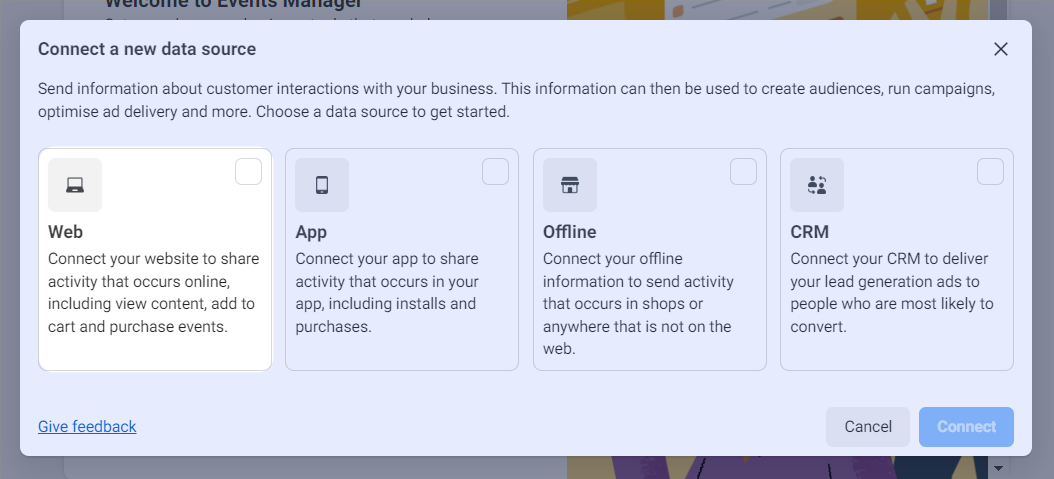
A pop-up window will appear asking you to choose a data source for your pixel tracking. Certainly, at this point, we will choose “web”, but we will write another article on how to track mobile apps.
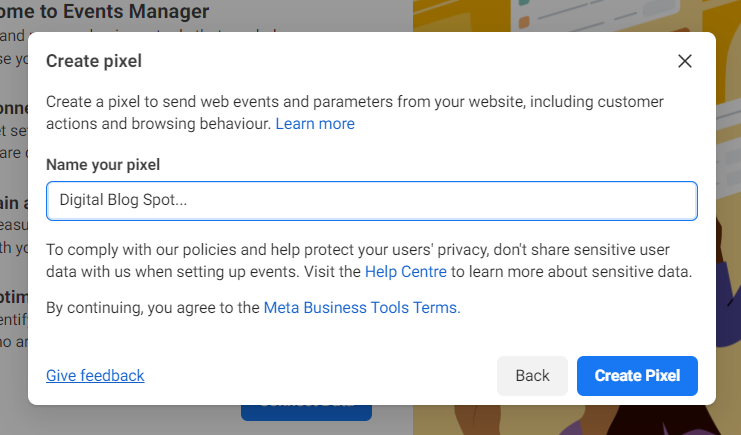
After choosing your Facebook pixel type, you will be prompted to type in your pixel name. Add in the desired name for your pixel. I personally prefer to structure the name as follows (Brand name | Data Source | Date Created).
This makes all associated data with that pixel visible every time you access the events manager and you won’t get confused between the different pixels that you have created.
When you are done choosing your pixel name, click on the “Create Pixel” button.
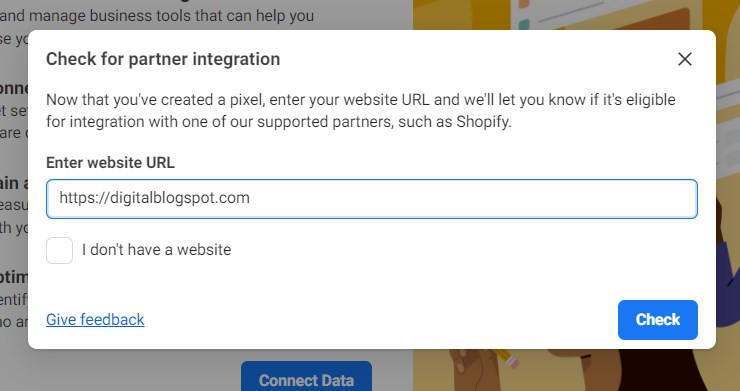
Enter your domain name and leave the I don’t have a website checkbox unchecked.
After the tool is done checking, it will show you a dropdown message like this, if you have developed your website using WordPress, or other third-party block builder tools.
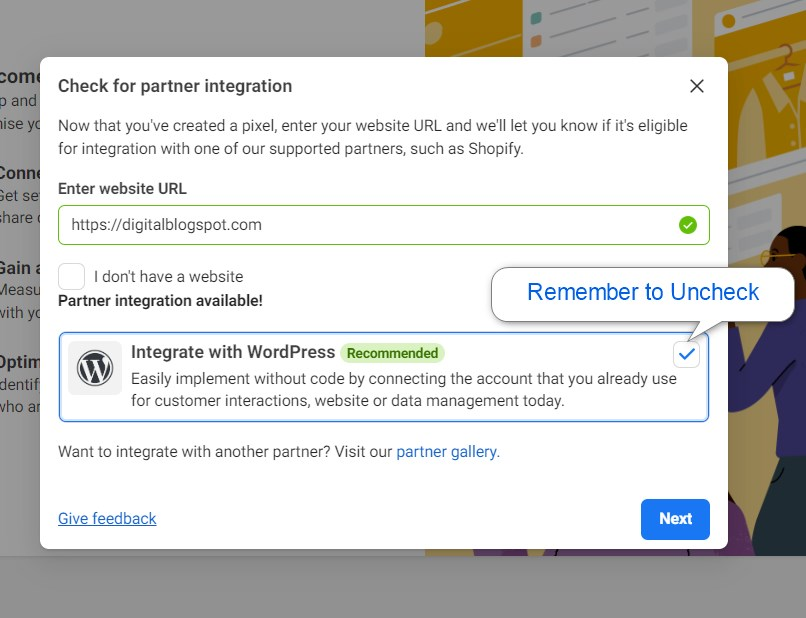
After clicking next another window will show asking you whether you want to install Facebook pixel through the manual integration only, or you want to add the conversion API integration as well.
If you are supported by a developer and have access to fast communication, I recommend proceeding with both. But if you are doing this alone without a developer’s support, then choose manual integration only.
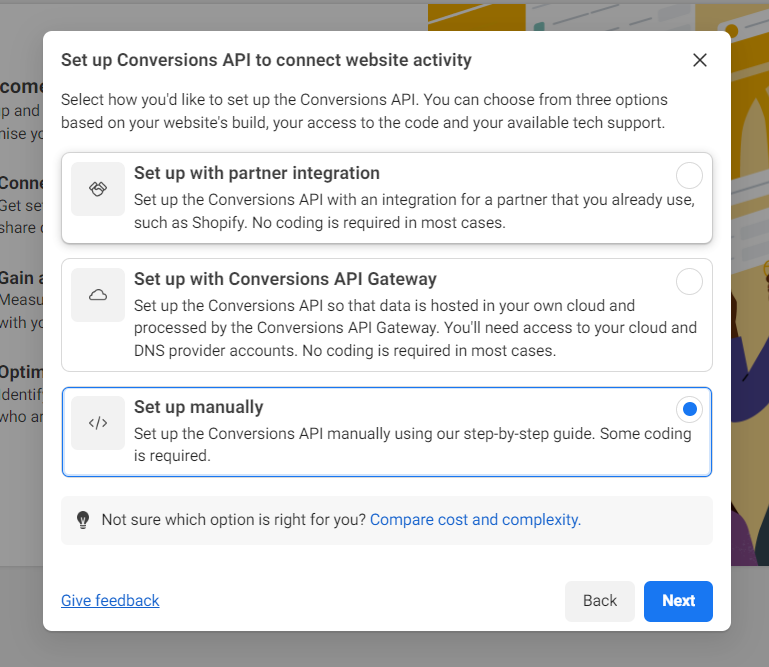
Click on Set up manually and then click next.
Easy peasy! It’s time for you to go grab a cup of coffee and come back to focus on the technical part.
Copy the Facebook Pixel base code
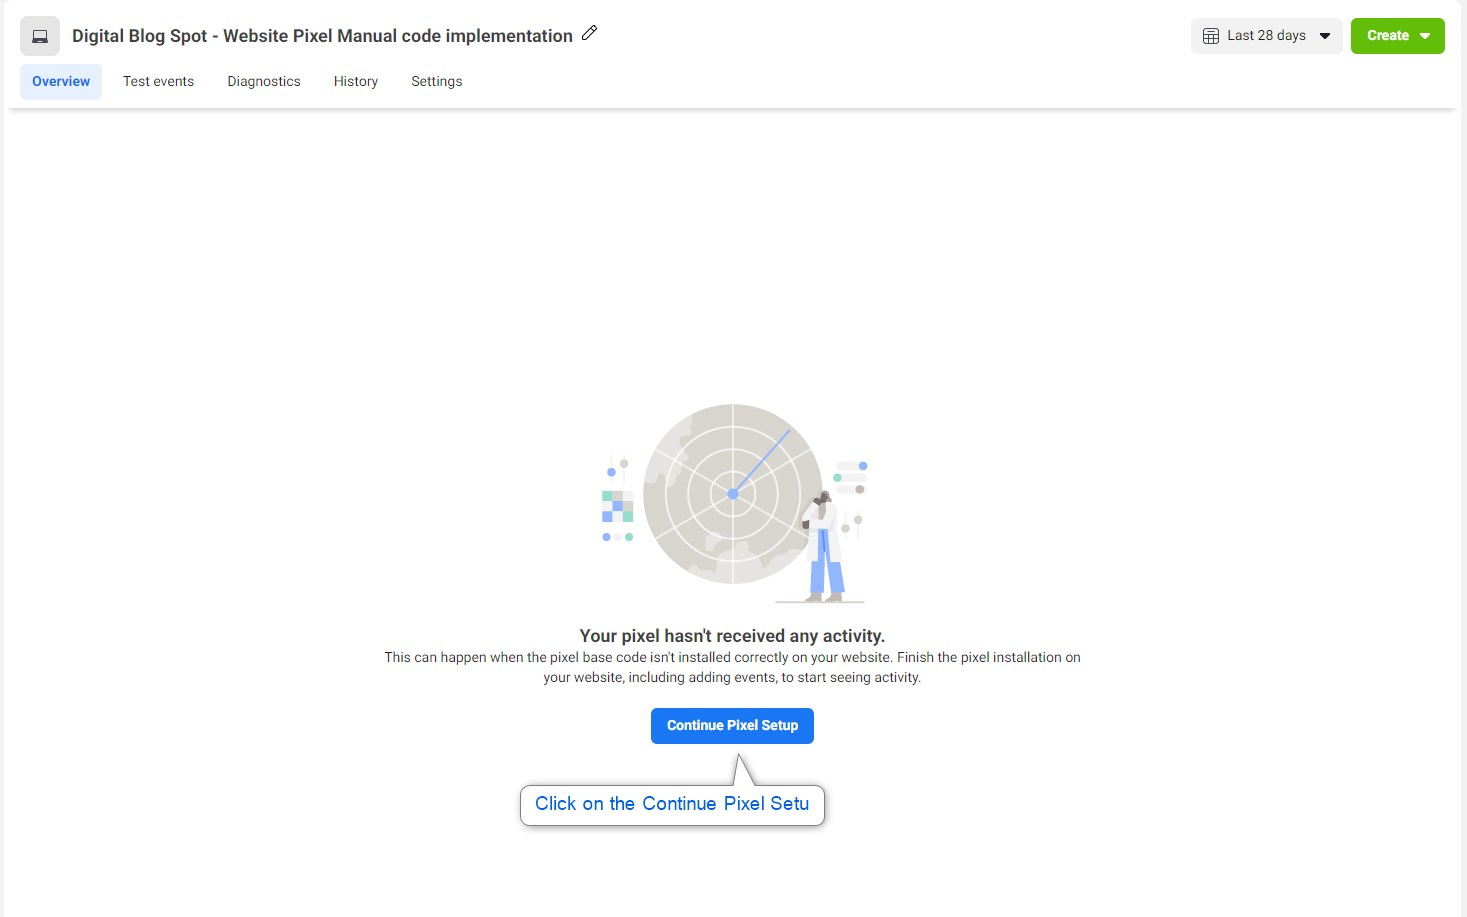
Click on the “Continue Pixel Setup” button and Choose Meta Pixel as per the below image.
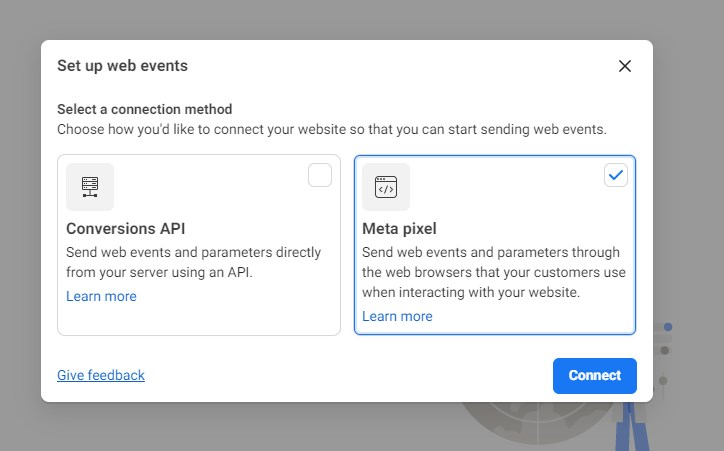

Click on the install code manually button.

Now you should be able to see a screen similar to the one above where you should copy the base code and then move to your Google Tag Manager website container.
When you open the Google Tag Manager workspace, you should see something similar to the below screen.
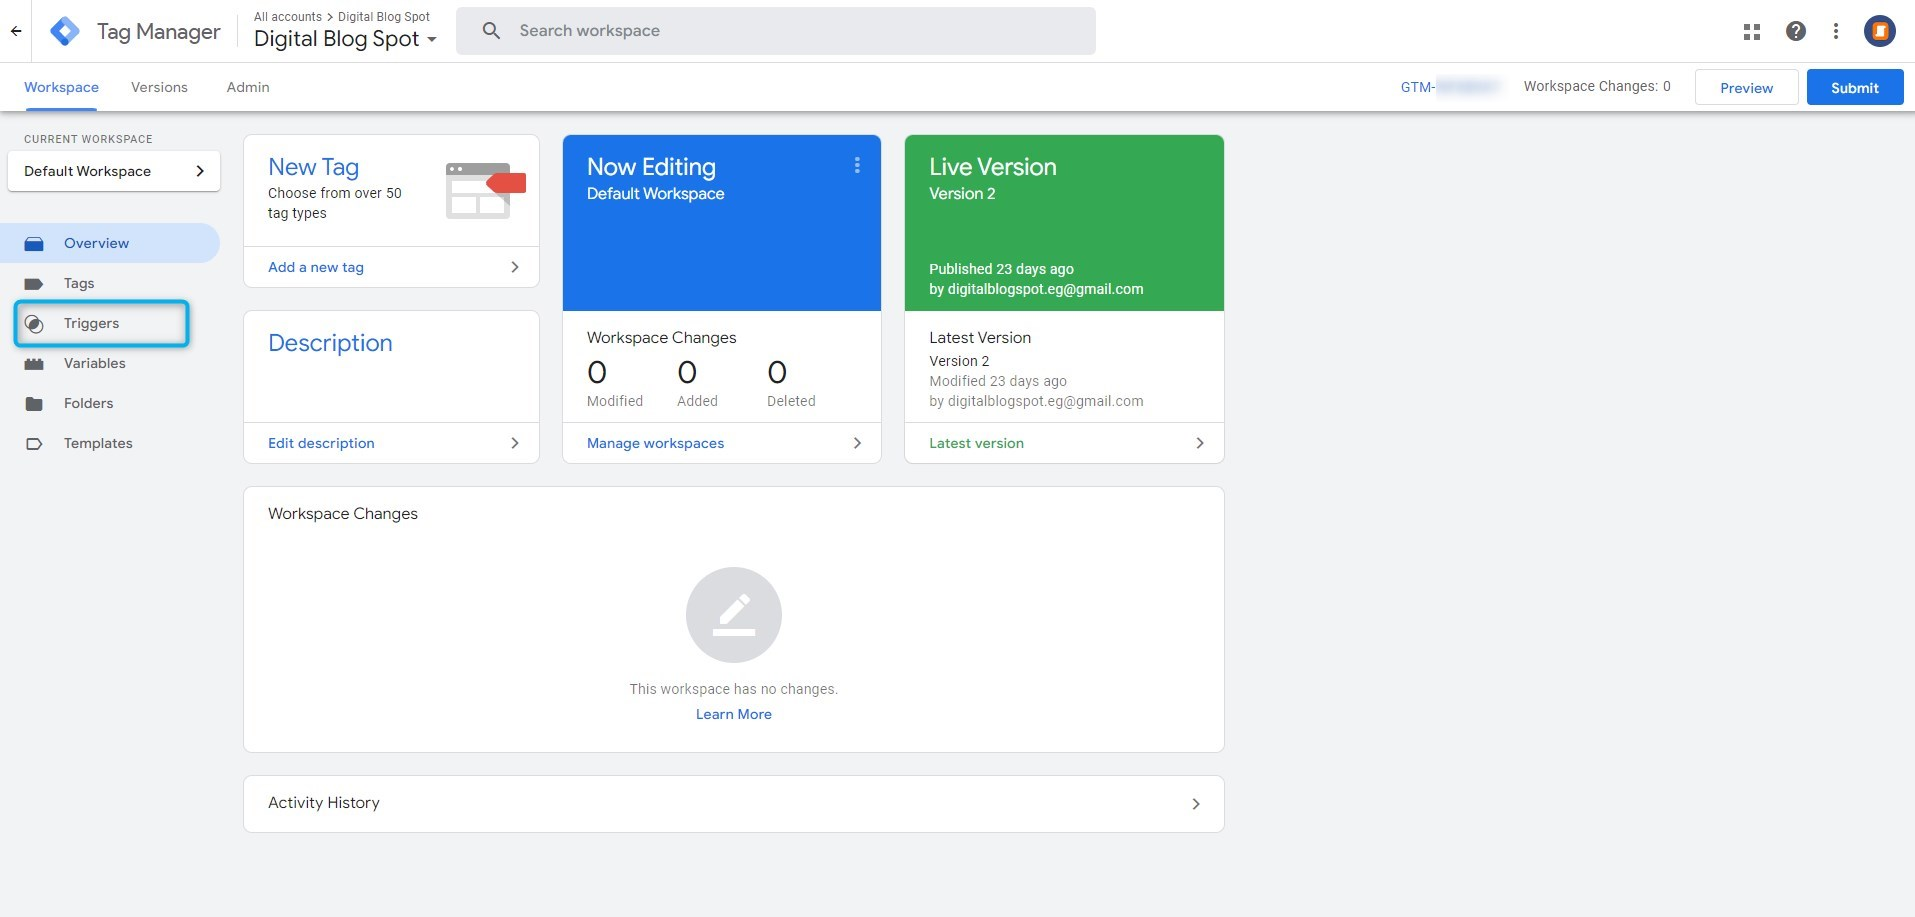
As soon as you land on the google tag manager dashboard, you will find a left side panel including all the navigation elements needed. You might notice that the Tags, Triggers, and Variables components, which we spoke of earlier, are all listed in this panel.
Creating your base Facebook Tag configuration on Google Tag Manager
To start with creating your base Facebook pixel code, click on the Add a new tag and a new window will pop up
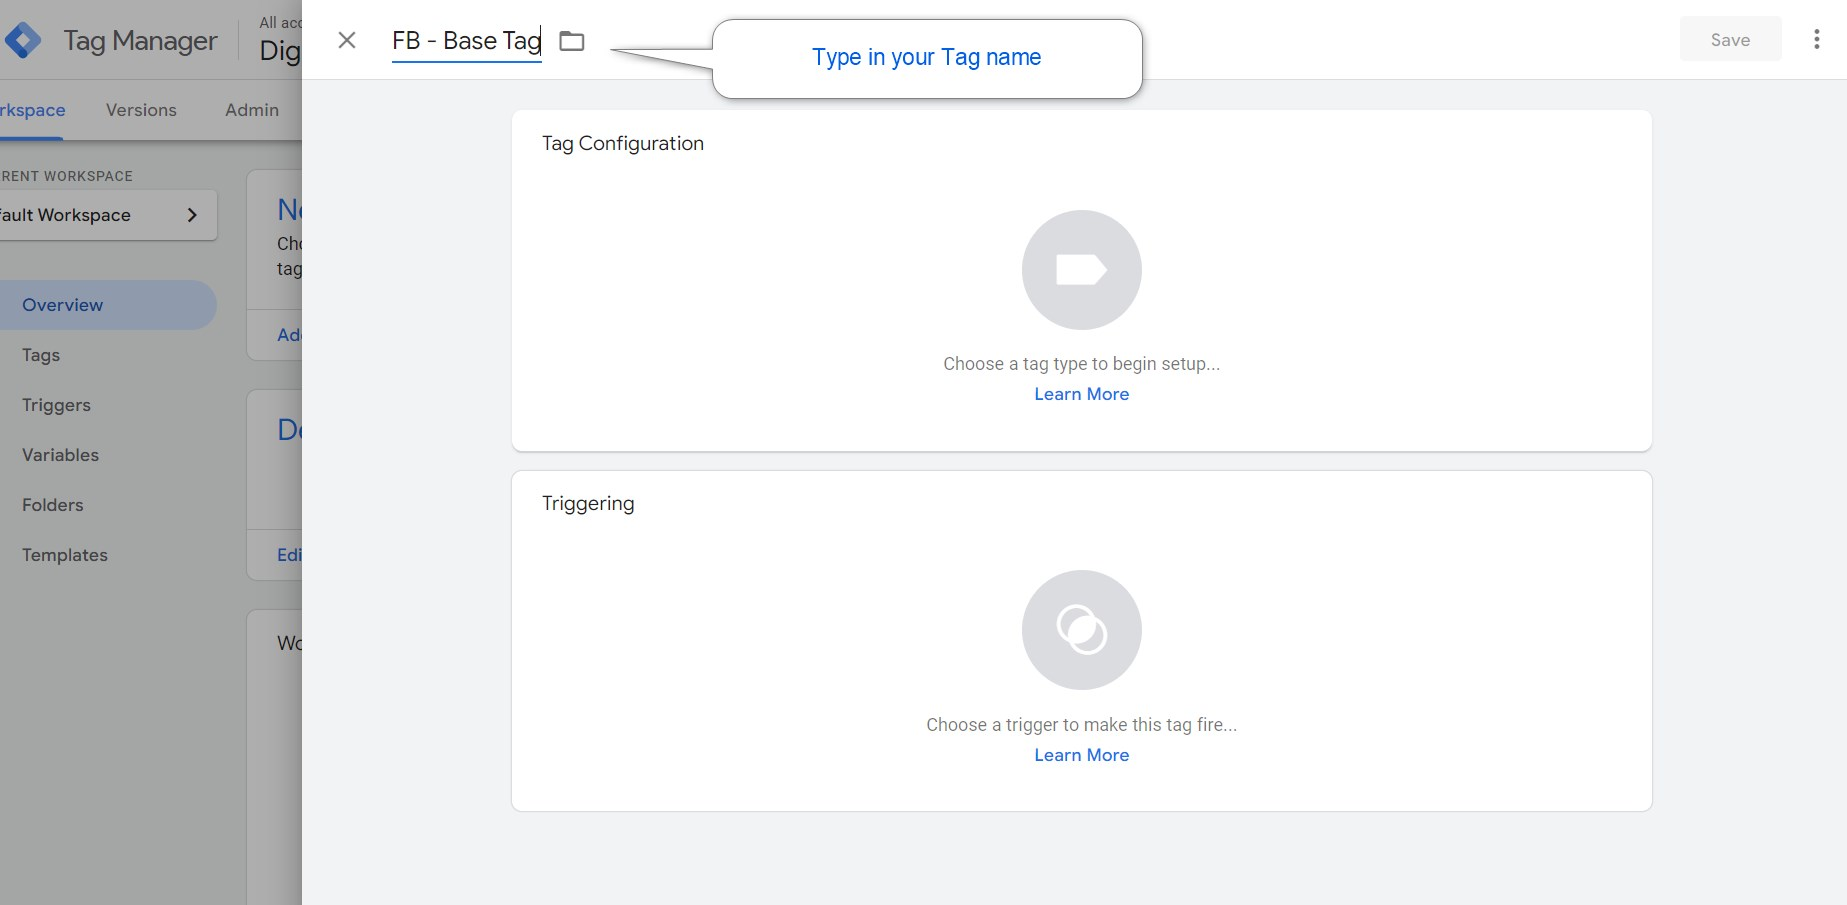
At the top left corner, you will find a text box asking you to enter your Facebook pixel tag name. Your tag name should be something as follows, Platform name initials (Facebook = FB) followed by the objective or type of tag (Base pixel code = Base Tag).
Rest assured that this name will not be shown to any website user and will not appear in your Facebook pixel in the Facebook events manager. It will however be the only way inside the Google tag manager which will help you identify the purpose of that tag.
To move forward, click on the tag icon inside the circular grey shape and you will move to a right-hand side panel.
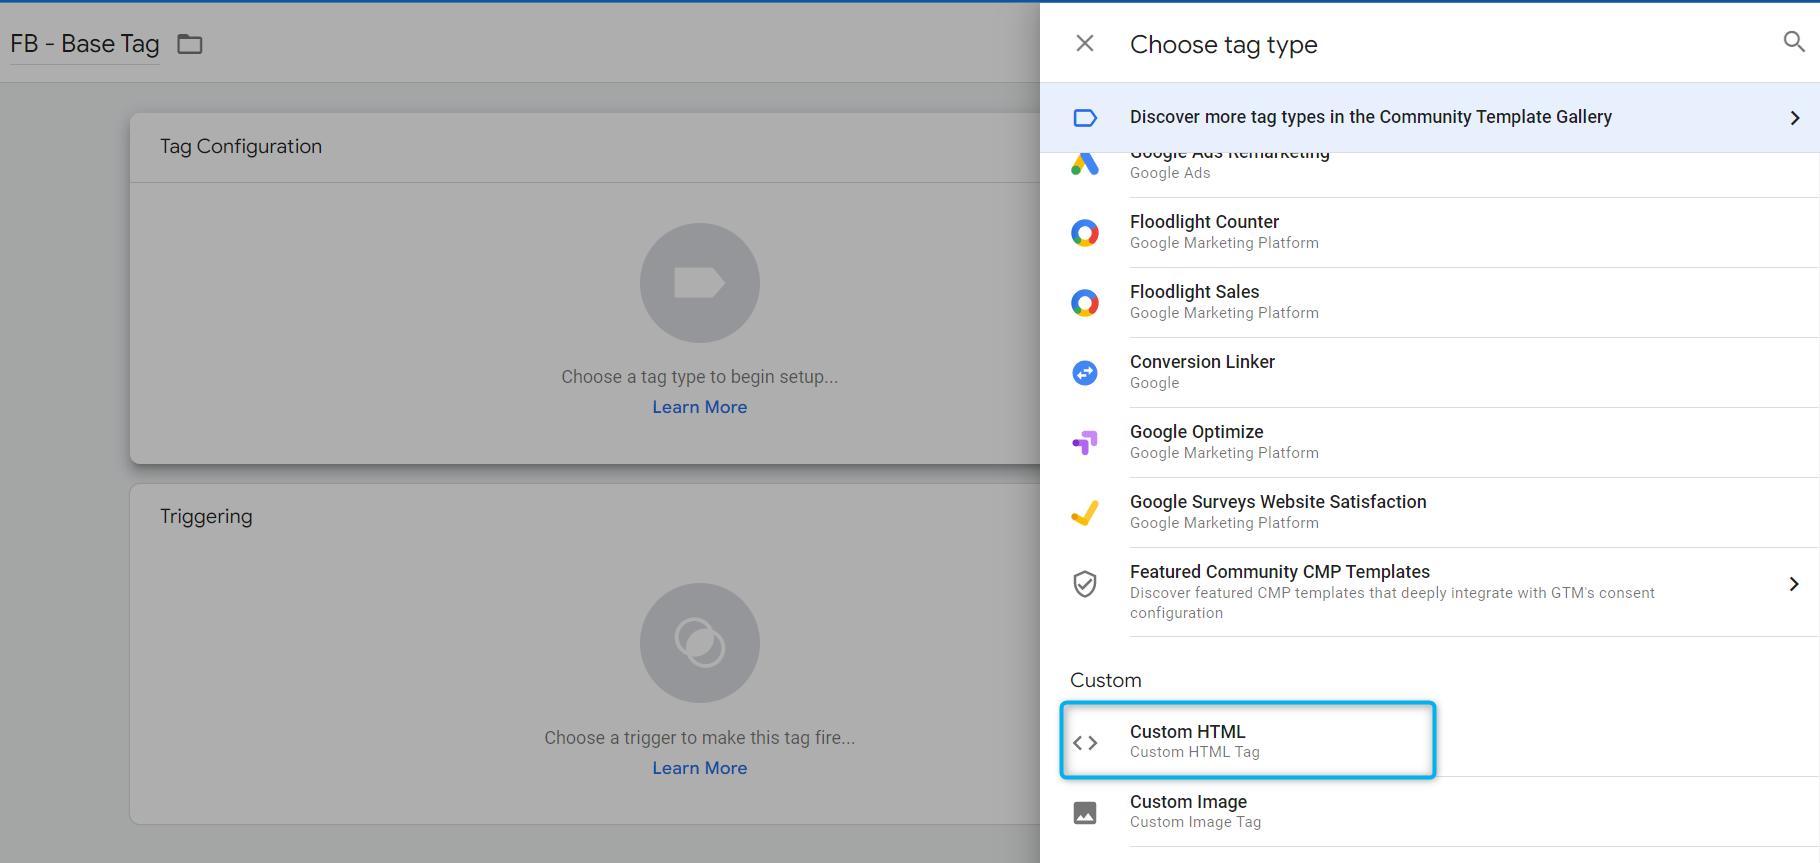
The right-hand-side panel includes three types of tags.
Featured tags created by Google for its own platforms and marketing solutions.
Custom tags including a custom HTML tag and a custom image tag
More tags, which include tags created by third-party tools that can integrate with the Google tag manager.
To set up the Facebook pixel code, we will choose the custom HTML tag and a placeholder for the code will display.
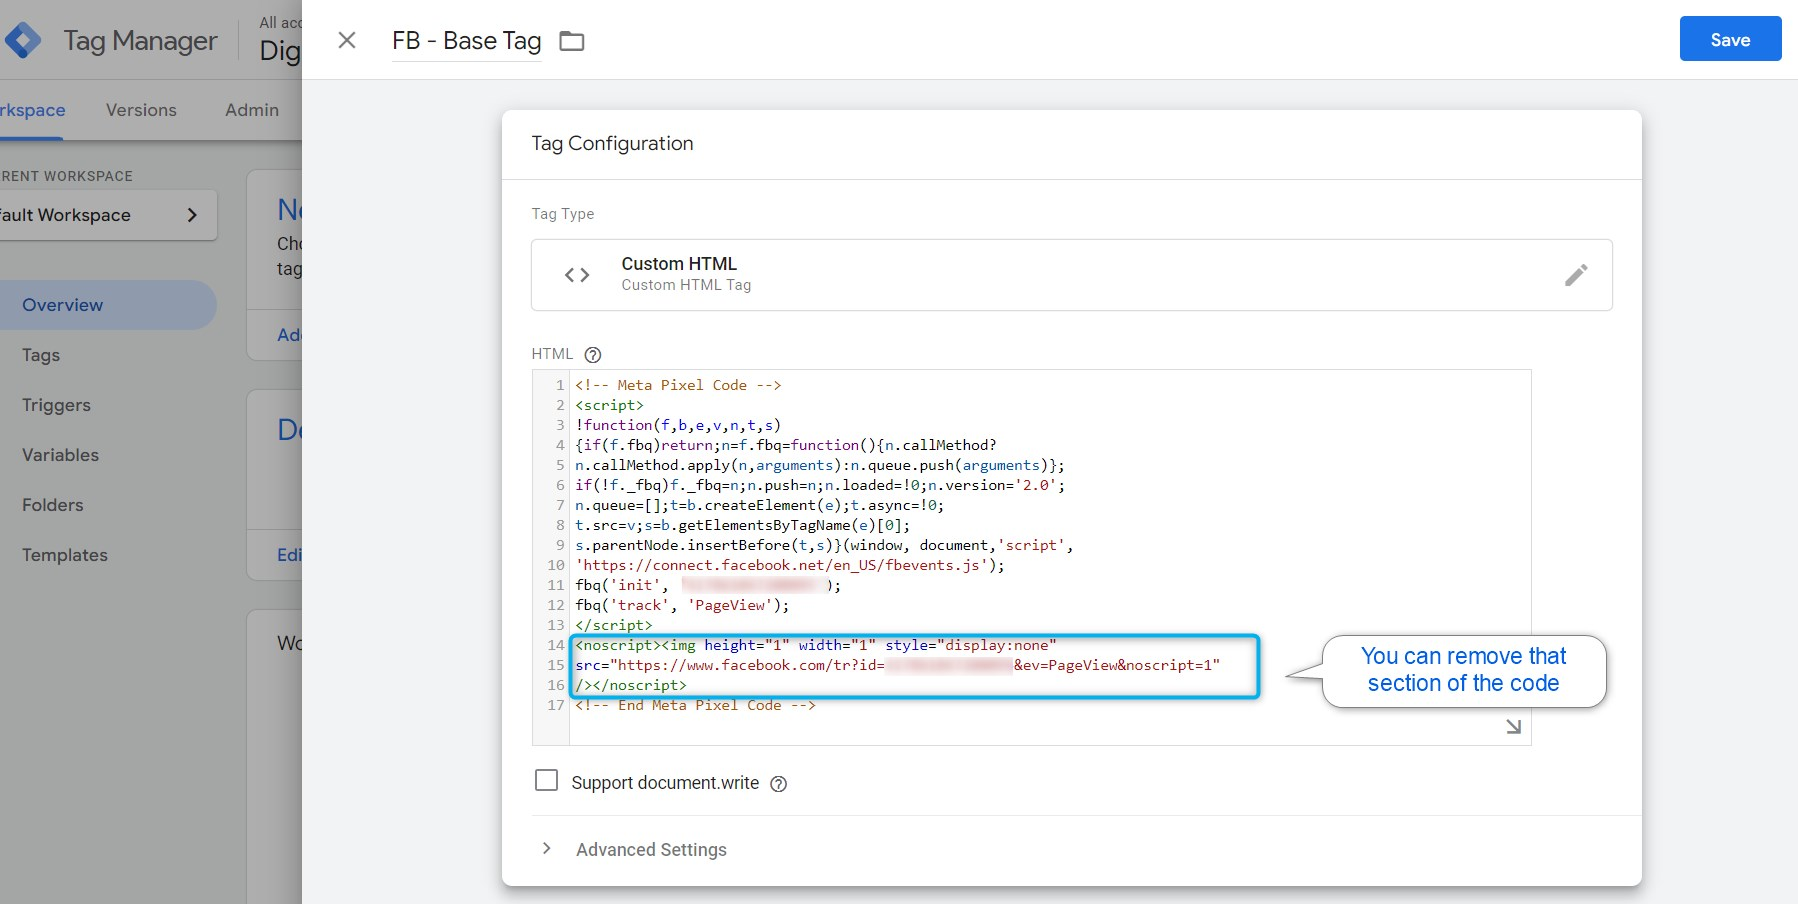
After pasting the Facebook pixel code inside the HTML section, scroll down until you see a second circular grey area reading trigger.
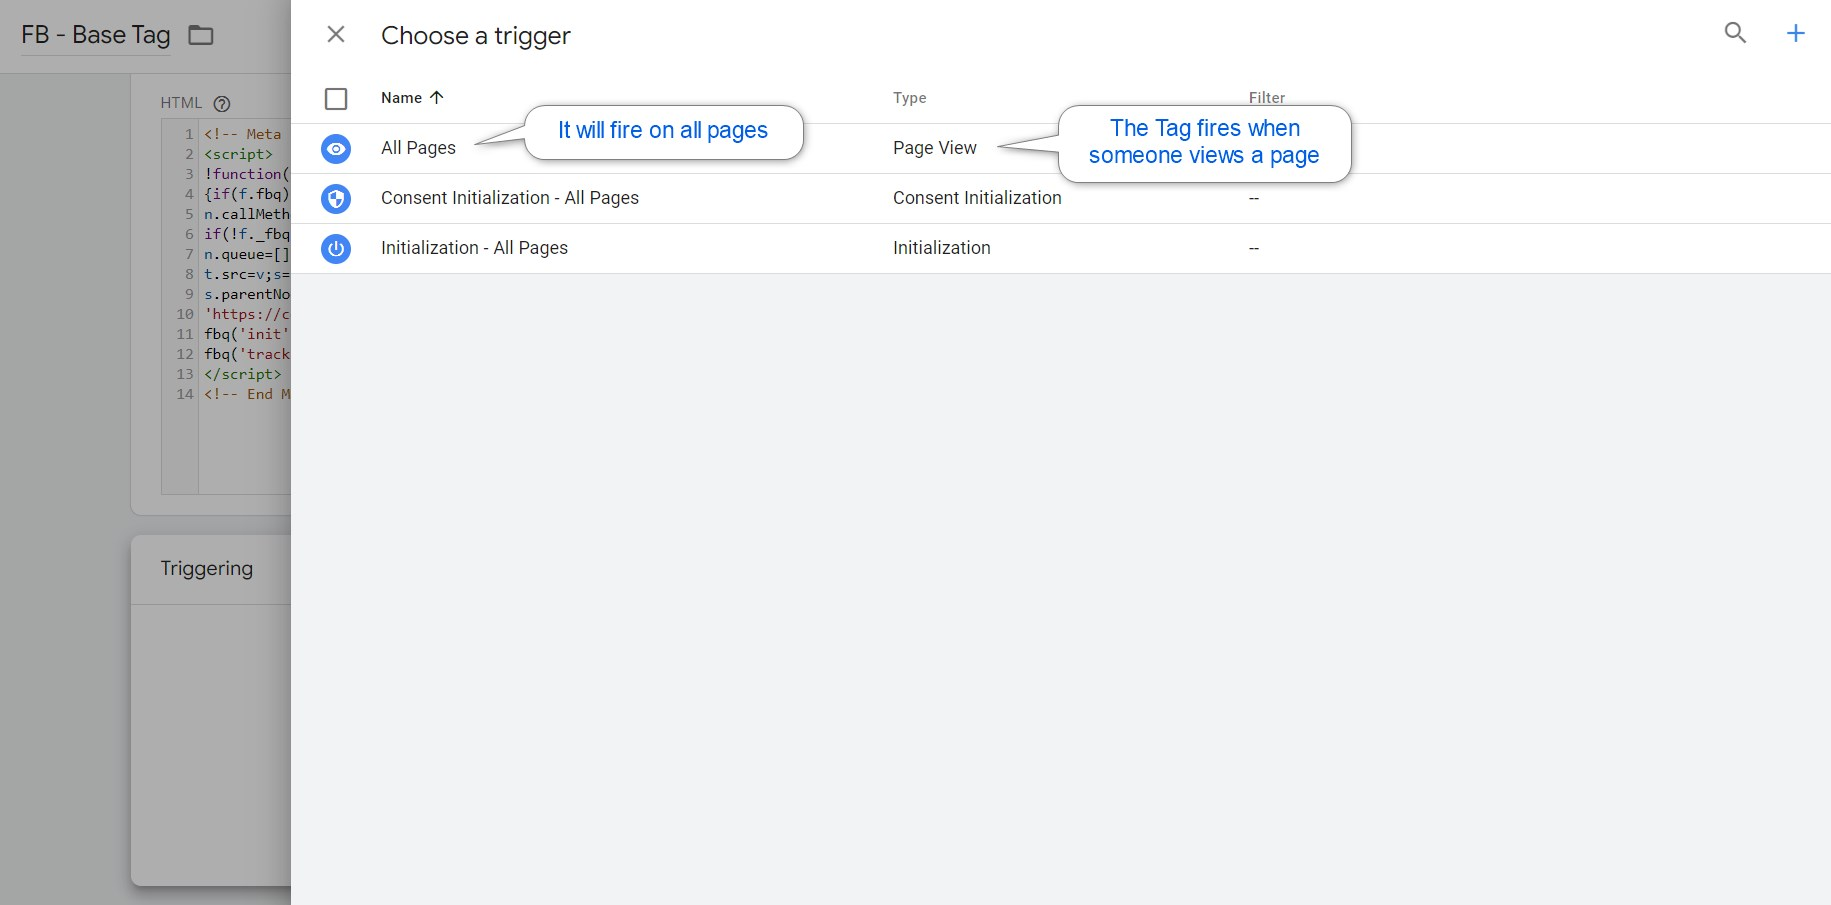
You will find a list of three pre-defined triggers.
A trigger can be any action that a user may take on the website. A pageview trigger fires when a user visits any page on your website and that page loads. Our Facebook pixel code tag will be set to fire on all pages, Page View trigger.
By setting your Facebook pixel tag to fire with an “all pageviews” trigger, you are telling Google Tag Manager that you want that tag fired on all your website’s pages.
Click save at the top right corner and you are done setting up your Facebook base tag. But, you still need to test it before publishing to make everything works just fine.
To test your Facebook pixel and events tags setup on your website, you will need to install the Facebook pixel helper extension and Google Tag Assistant on your Google Chrome browser.

Set up Facebook pixel helper
In order to set up the Meta pixel helper, previously Facebook pixel helper, you would need to go to the chrome web store and search for Facebook pixel helper and then install it.
Facebook pixel helper extension should look something like a closing script tag on the top right section of your chrome browser. If you can’t find the Facebook pixel helper extension like in the above image, you can check the extension’s icon and then pin it to your browser.
Set up Google Tag Assistant
Google tag assistant is essential for previewing and debugging your tracking tags. In further steps, you would even need it to configure variables.
Similar to the previous step, you will go to the Google web store and search for Tag Assistant Legacy (by Google). Next, you will add it to your chrome browser and pin it to the top right corner of your browser.
Testing your Facebook pixel tag setup is working properly
Let’s move back to the Google tag manager workspace and click on the preview button on the top right corner of the screen.
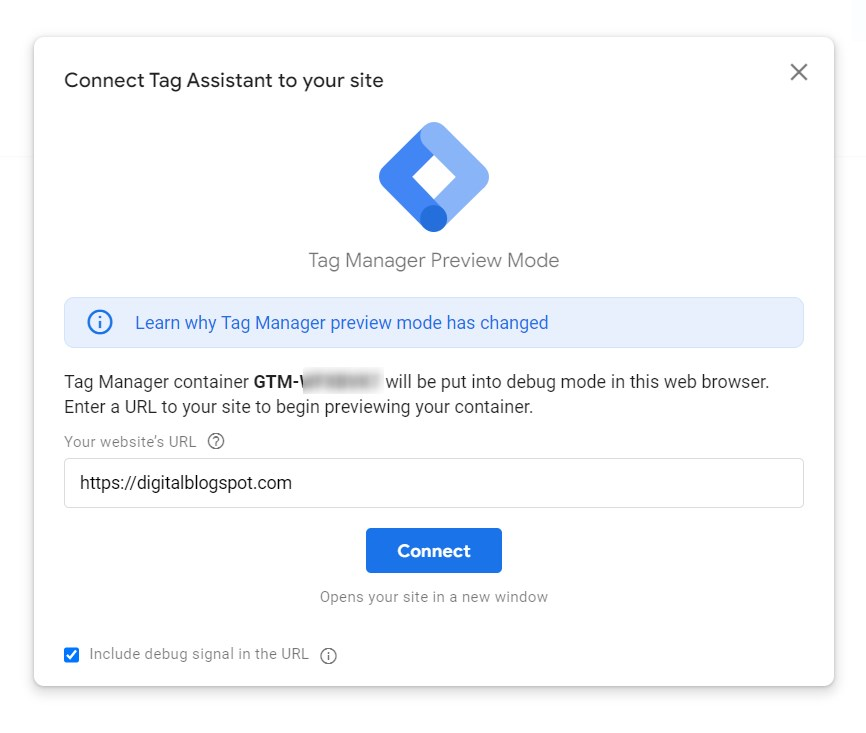
A pop-up screen will show asking you to fill in your domain name. it should be inserted as per the reference “https://google.com”.
Then click continue and your website will open in the new tab with the debugger.
Return to the original tab where the tag assistant is recording every step of your page’s loading. You will find the steps of page loading at the left-hand-side panel.
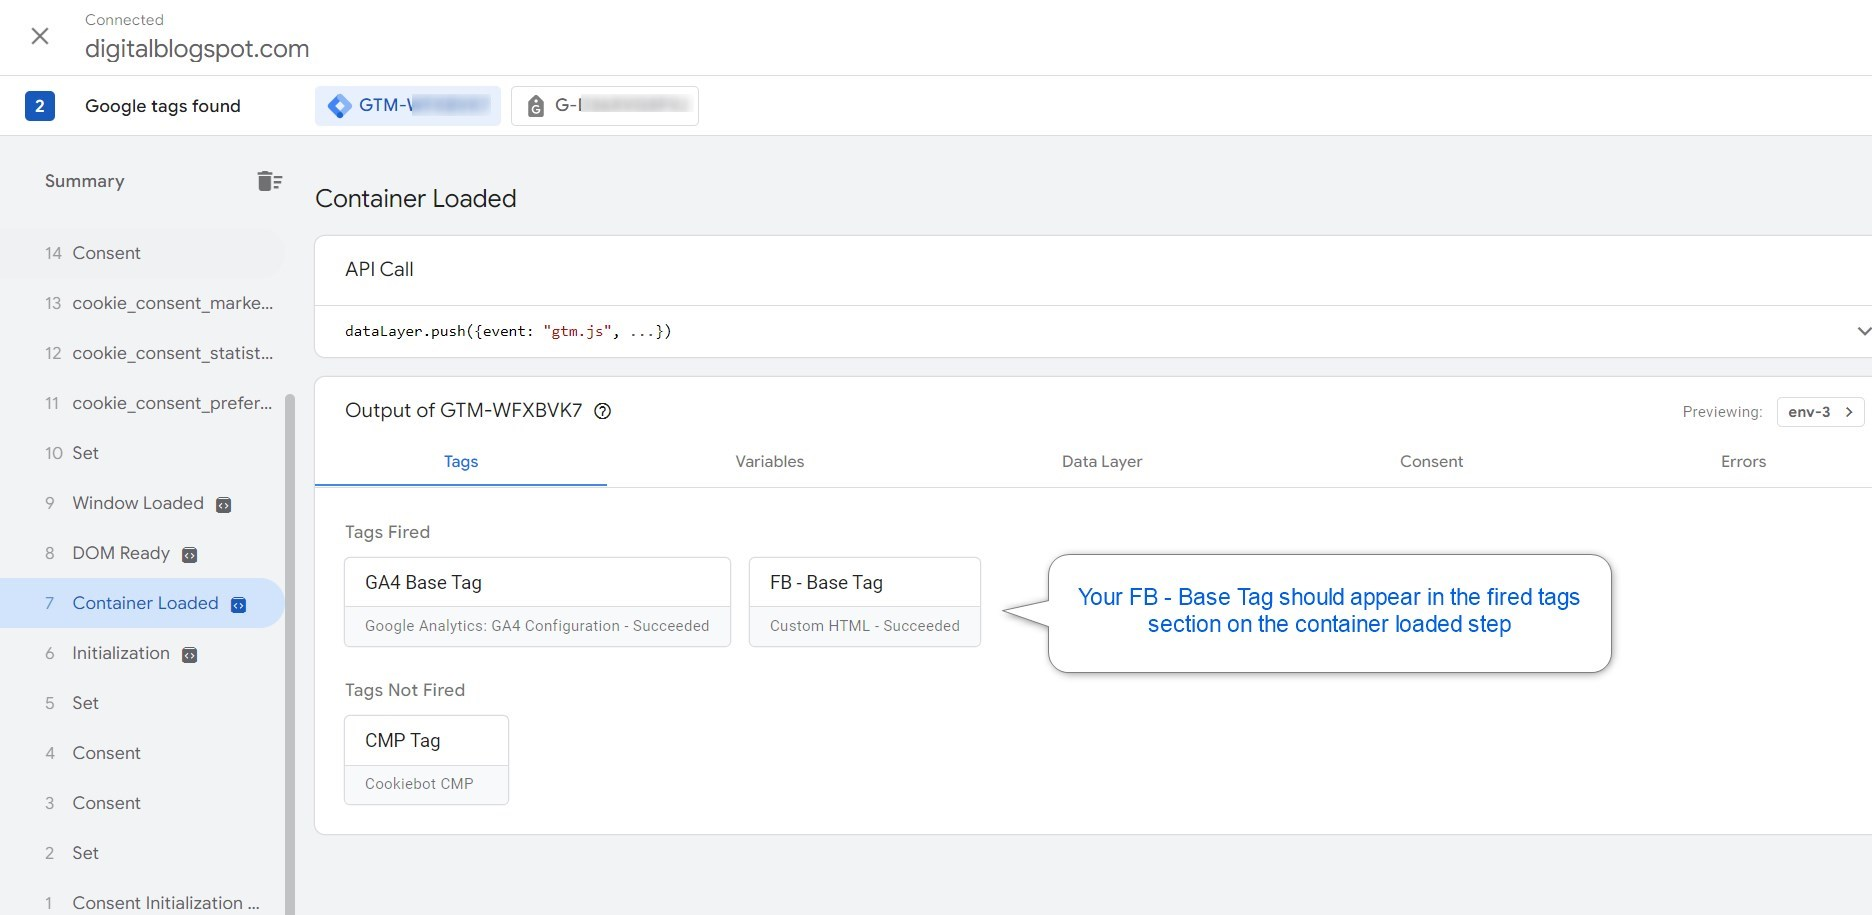
At the container loaded step, you should find two sections, Tags Fired and Tags not Fired. You should be able to see the FB – Base Tag in the Tags Fired section.
If everything works like a charm, then let’s proceed to standard events tag configuration.
Standard pixel events are different from one website to the other based on their nature. For example, an e-commerce website would use the InitiateCheckout and Purchase events, while a blog website will use the Subscribe events.
Setting Up Facebook Pixel standard events
Facebook standard events are sets of codes that complement the base code and should be fired on specific pages or actions taken on your website.
A Facebook pixel standard event code consists of two parts, an event and a set of parameters.
A parameter determines the value of an attribute associated with each event taking place. For example, to return the total value of a purchase that took place, you will need to set a “total” parameter and a “currency” parameter.
A good example of an event would be when someone completes a purchase and reaches the thank you page. Facebook pixel should report that a purchase event was taken, but wouldn’t be able to report any extra data unless the proper parameters were configured.
For setting up standard events through Google Tag Manager, a data layer has to be developed among your codes, and for that, you will definitely need a developer.
What is a Google Tag Manager dataLayer?
Imagine your website being a workspace in a large company and the floor has a thousand employees all in one space. You need to gather some data related to the company, but you don’t know who performs what task.
Then, a receptionist came all of a sudden to tell you “let me know all the information you need to gather from the staff, and I’ll go grab it for you”. The receptionist then goes into the floor, wanders around for a few minutes, and returns with a small sheet of paper including all the information you have been asking for.
Data Layer works the same way. The floor full of staff is your website’s code. You most certainly won’t understand which code does what. I mean, even the developer that created the codes, might forget about their functions and keep wondering for a while till he remembers.
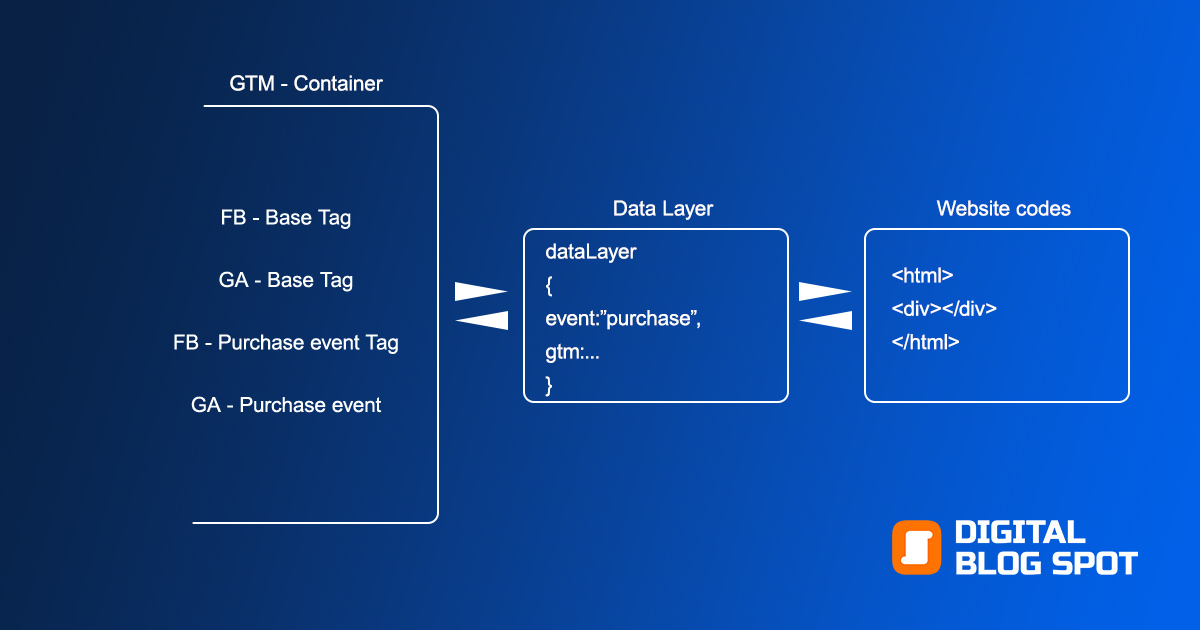
The data layer’s role is to gather the data that you are looking for in a short array code format. Then, that sheet called “dataLayer” shall be submitted to the Google Tag Manager.
The dataLayer has a specific structure following the Google Analytics guidelines.
I should imply here that Google Analytics – Universal Analytics property shall no longer be available starting July 2023. So, you will have to create the data layer based on the developer’s guide for Google Analytics – GA4.
I would recommend sending the developer’s guide to the developer and informing him/her of the events and parameters you want to track.
Reviewing the Google Tag Manager Data Layer through Tag assistant
To explain this better, I’ll take a live example for a Purchase step of an e-commerce hotel website that sells hotel rooms.
To start reviewing your Data Layer structure go to your GTM container and click the “Preview” button at the top right of the screen. Same as we did with the Facebook pixel testing step.
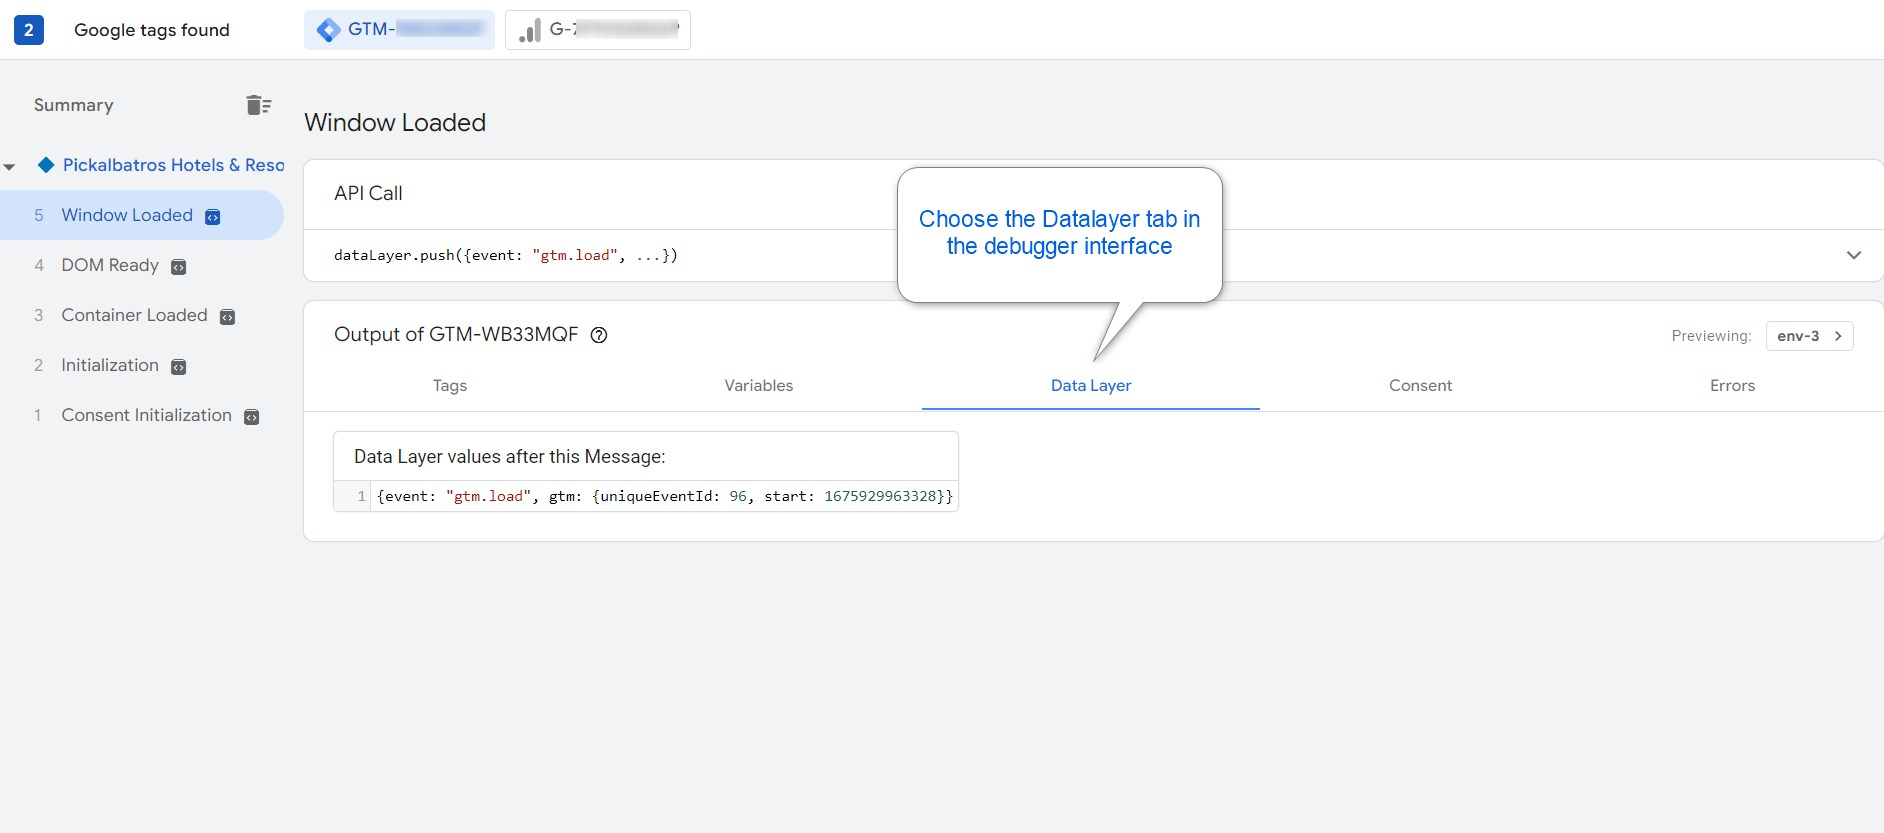
When the tag assistant debugging mode is on, move to the Data Layer tab in the top menu.
Then, go to the browser tab in which your website is open and start going through the user journey until you complete a purchase.
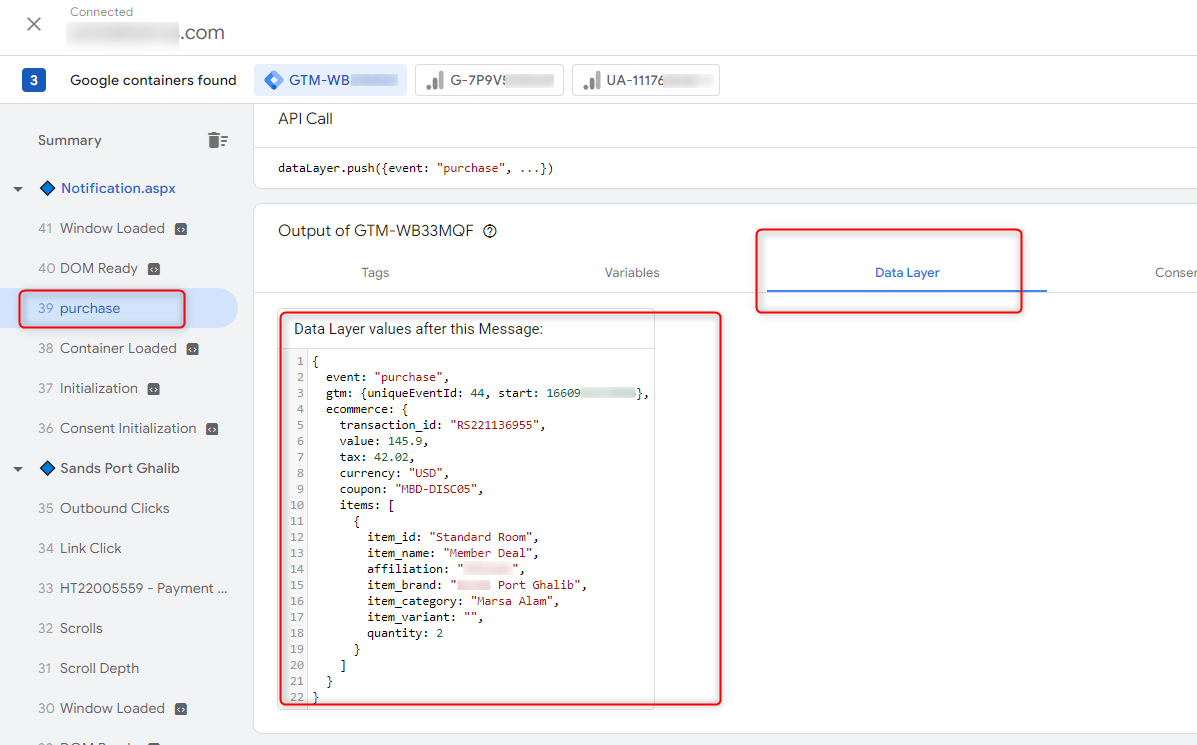
As you can see, the Data Layer structure will start to form up in the Data Layer tab. If you see any errors with one of your parameters, reading “null” or “object”, contact your developer to fix it.
Since Facebook pixel standard event tags are built using custom HTML, we will have to configure some triggers and variables ahead.
We will start by creating a custom event for the Purchase event read inside the Data Layer.
Creating the Purchase Trigger
Now let’s move back to the Google Tag Manager Workspace and move to the triggers tab from the left-hand-side panel.
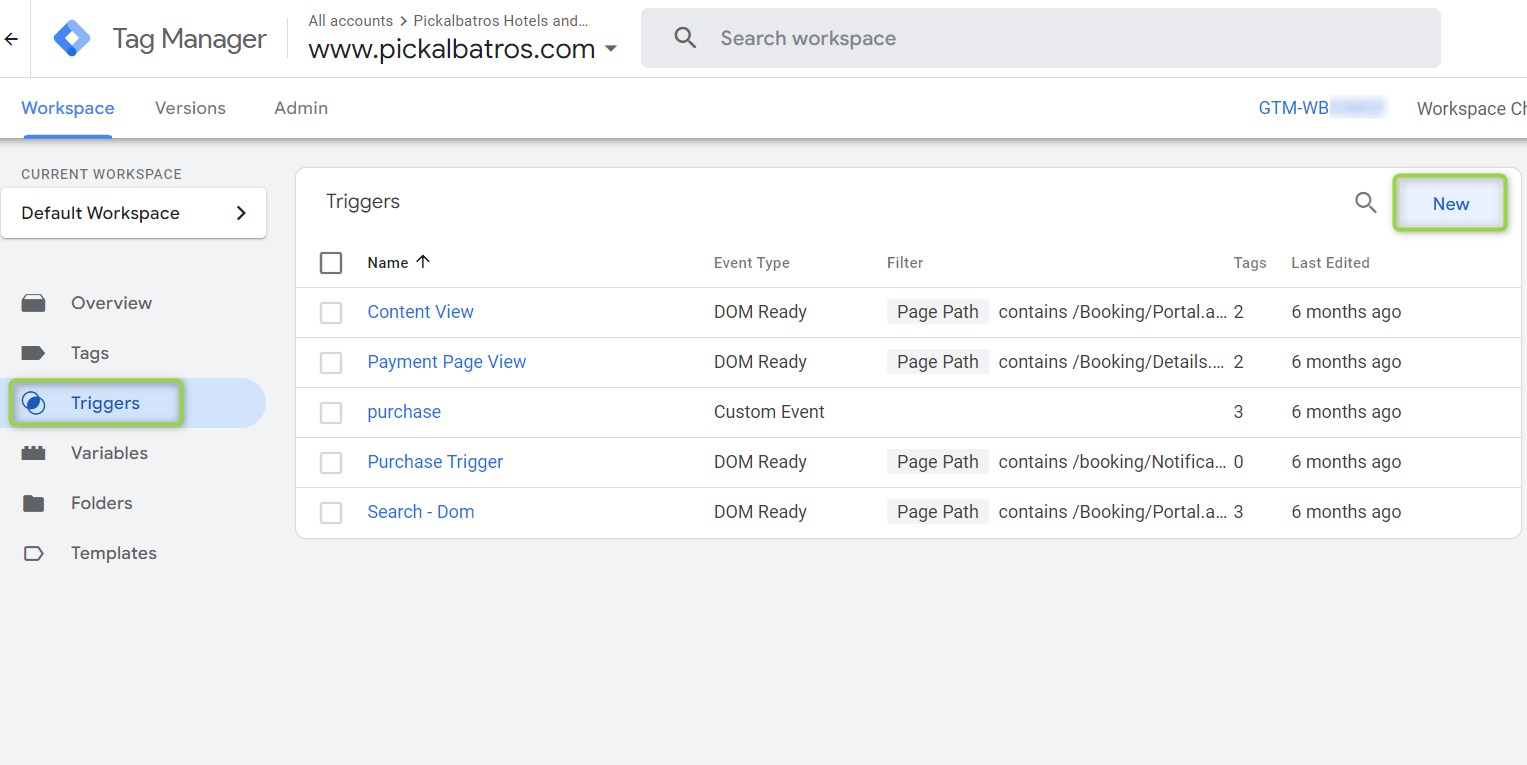
Add a new trigger through the “New” button at the top right corner.
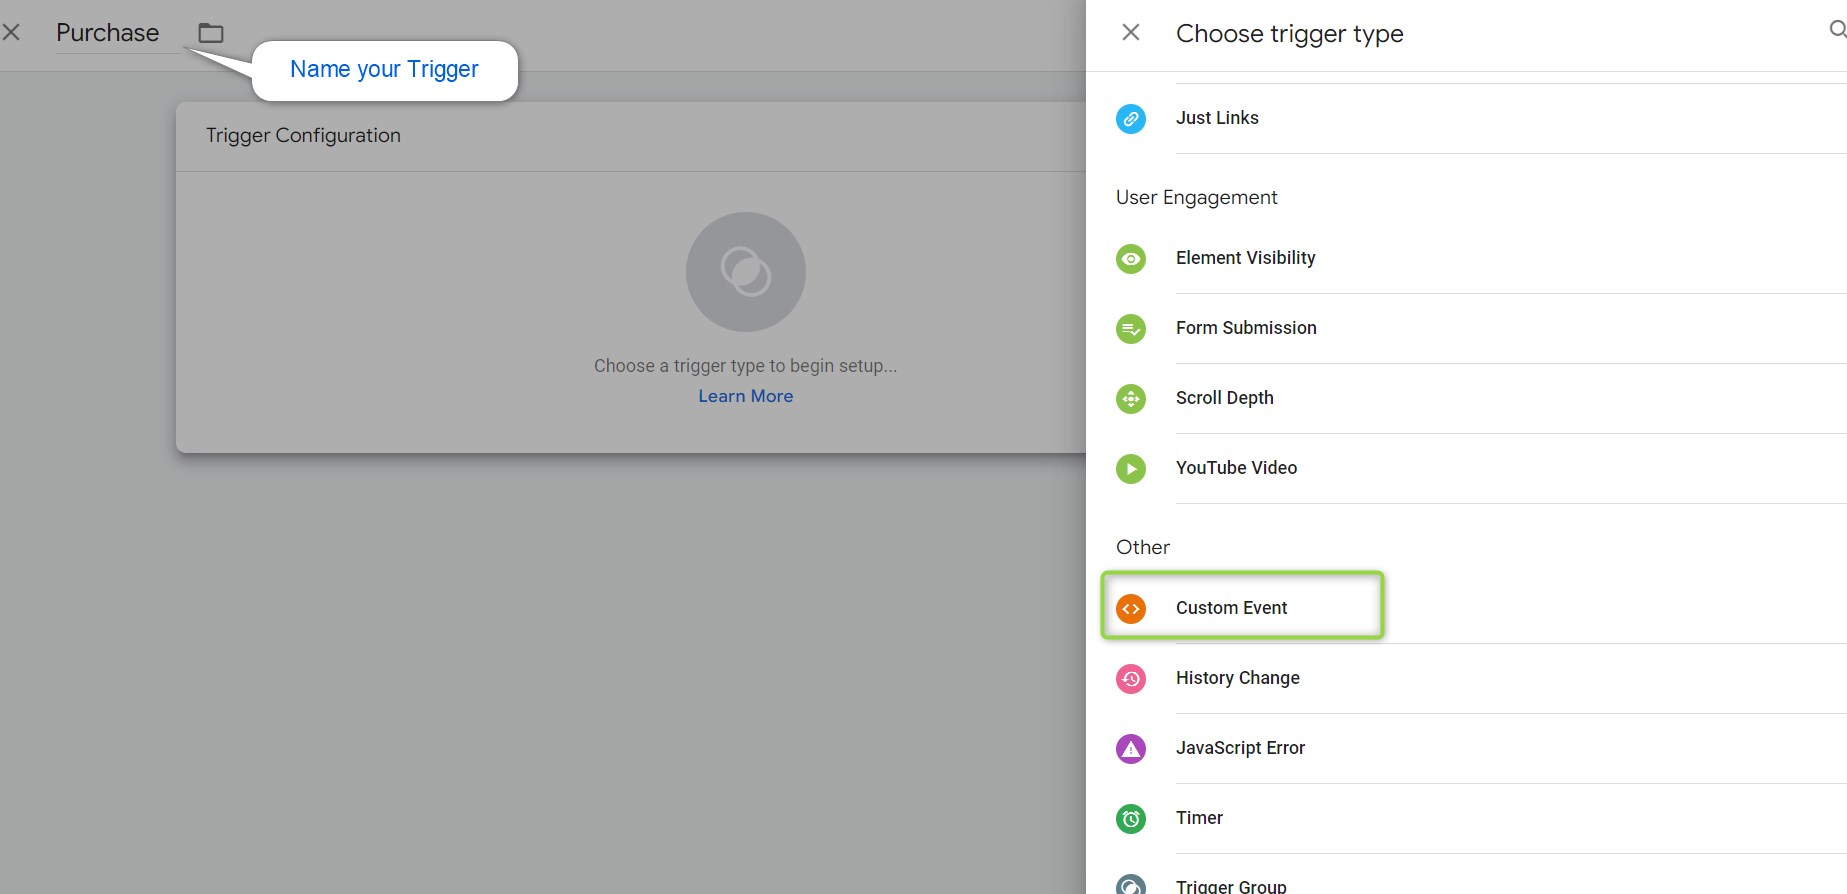
Click on the circular grey area to choose your trigger type, and scroll down until you find the “Custom Event” trigger”
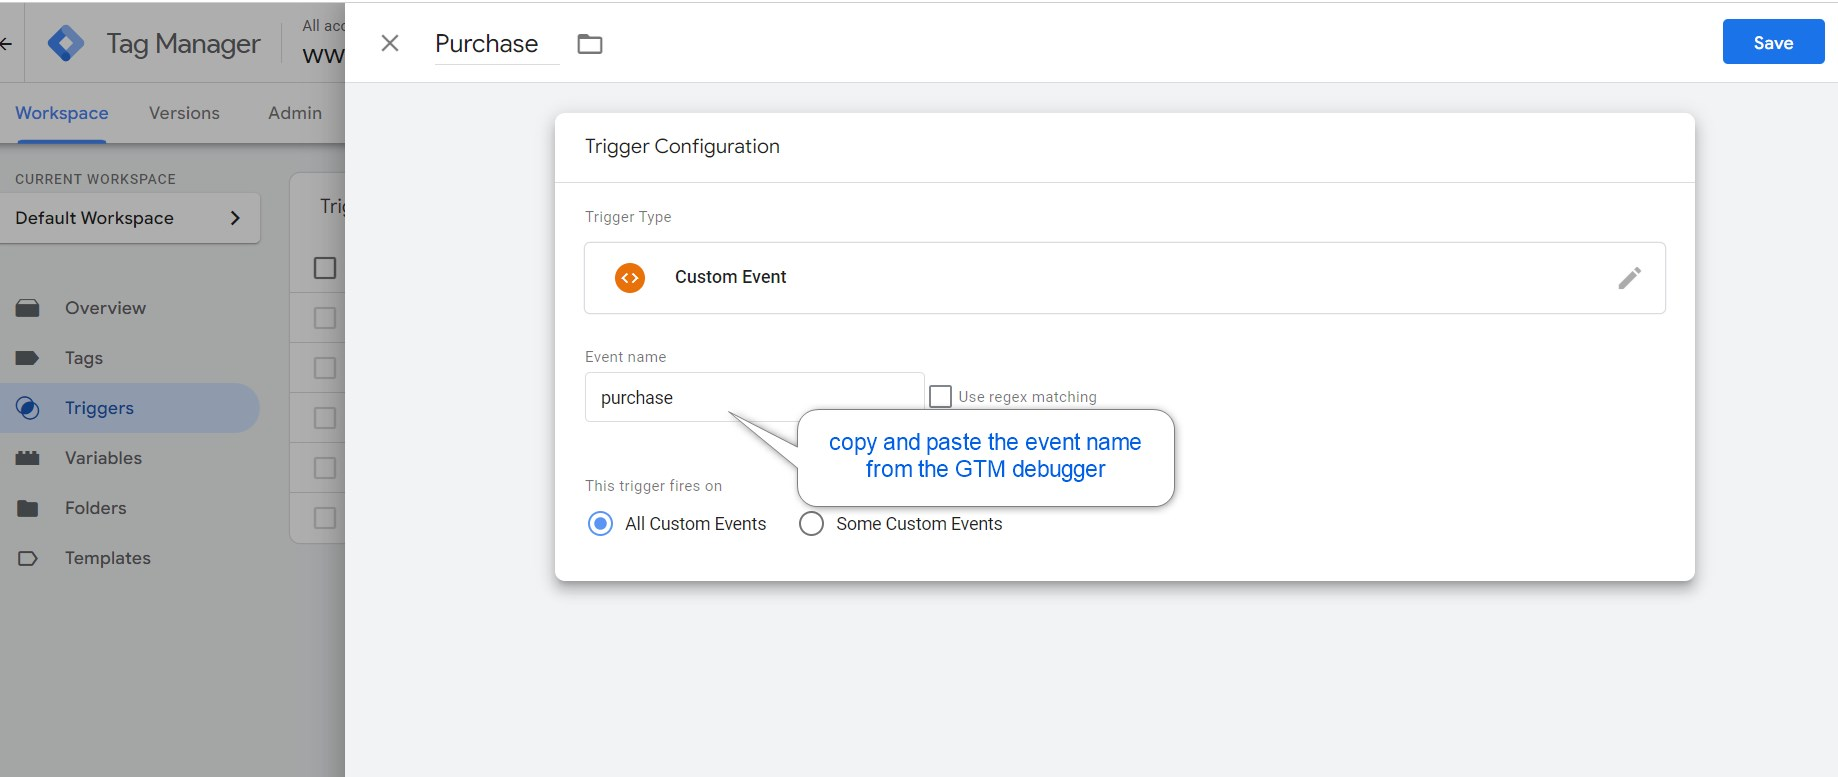
Copy and paste the event name exactly as written in the data layer
Set the trigger to fire on all custom events and save your trigger.
Creating all required variables
To create your purchase event variables you will need to move to the variables tab from the left-hand-side menu. Once there, you will find two lists with different variable types.
Built-in Variables
User Defined Variables
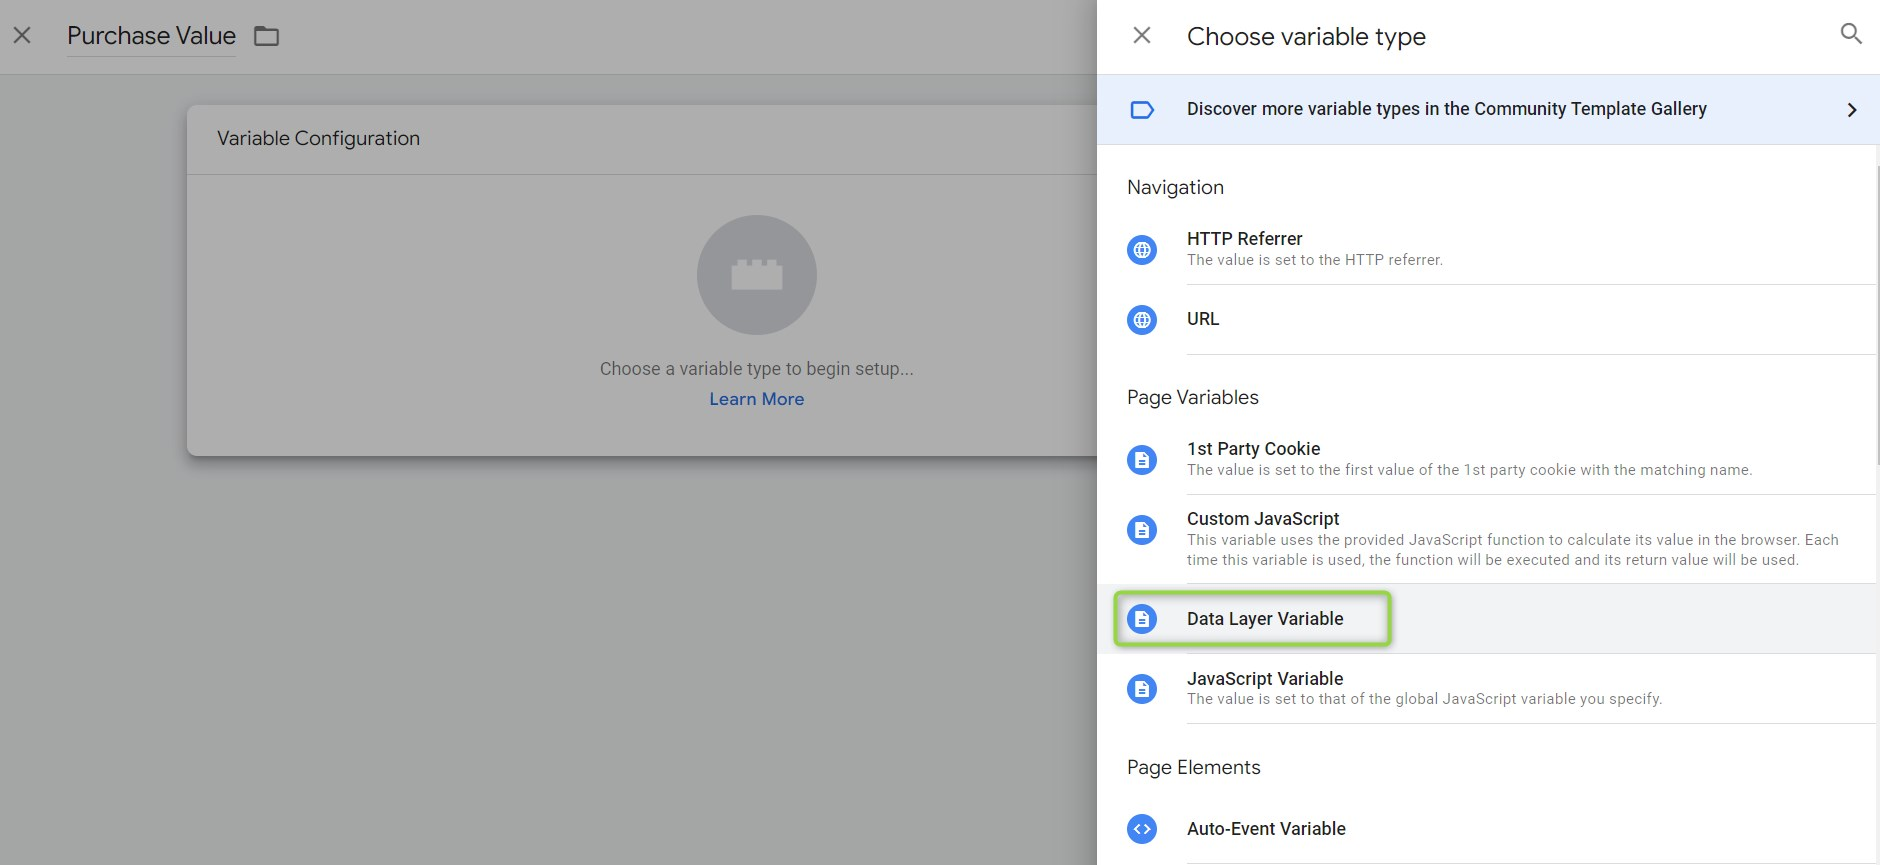
Under the user Defined variables, you will click on “New” to create a new Data Layer Variable. Then, you will name your variable something like “Purchase – Value”.
Now, let’s choose the variable type as Data Layer Variable.
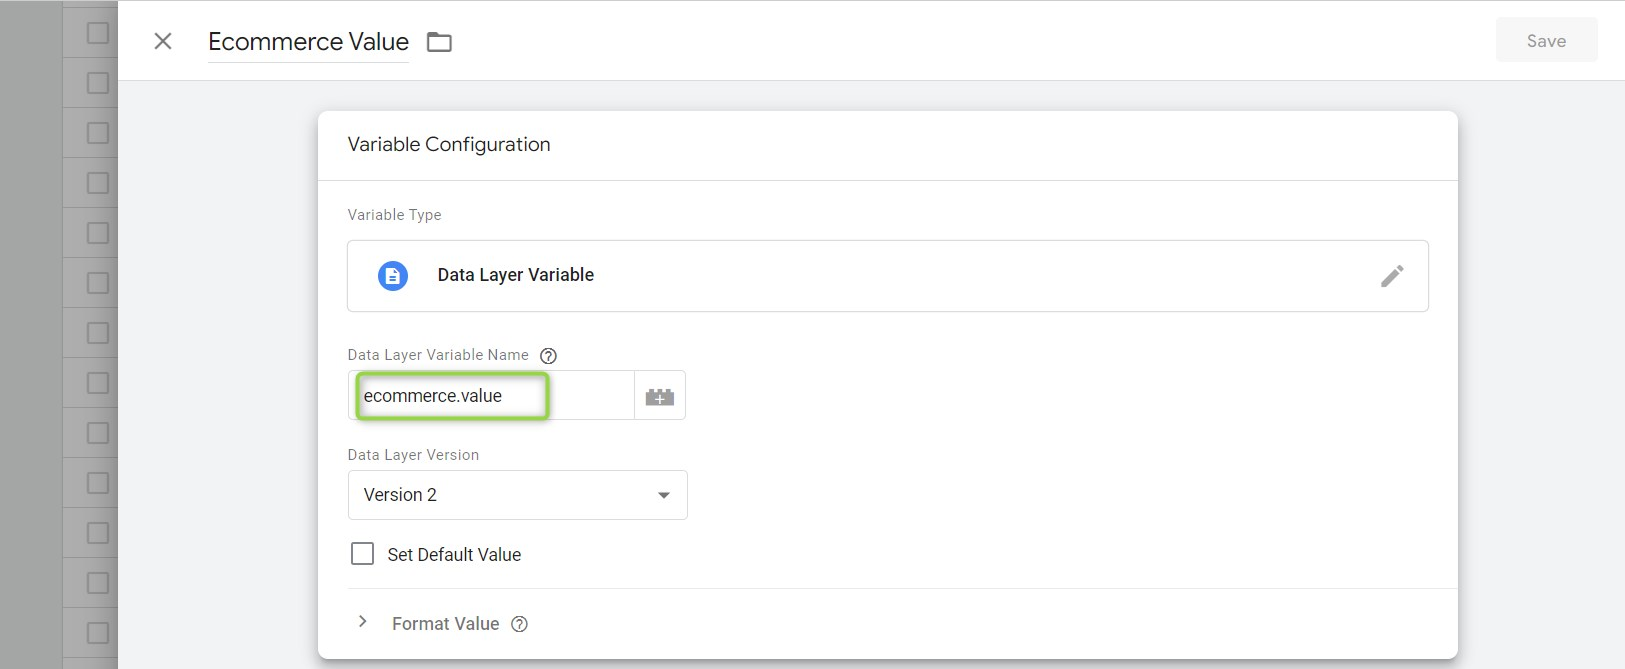
The “data layer variable” name is different from the “custom event trigger” name. See, when naming an event, we just copied and pasted the event name only.
Variables names are written in the form of a thread that includes the names of all parent arrays.
let’s take an example; In the above image showing the data layer structure, you will notice that “value” is a sub of the e-commerce array. Hence, the data we enter in the variable name will be as follows “ecommerce.value”.
Now we will proceed with the above steps and repeat them for each of the necessary variables to fill in Facebook standard events required parameters.
Facebook pixel standard events require specific parameters for each event to work properly and be able to optimize ad delivery for better results.
Building our first Facebook Pixel standard event tag
Let’s move back to the tags tab on the GTM left-hand-side panel. From there, we will click on “New”.
By now, we already know that Facebook pixel doesn’t have a pre-configured tag. So, we will scroll down in the tags list until we find a custom HTML tag.
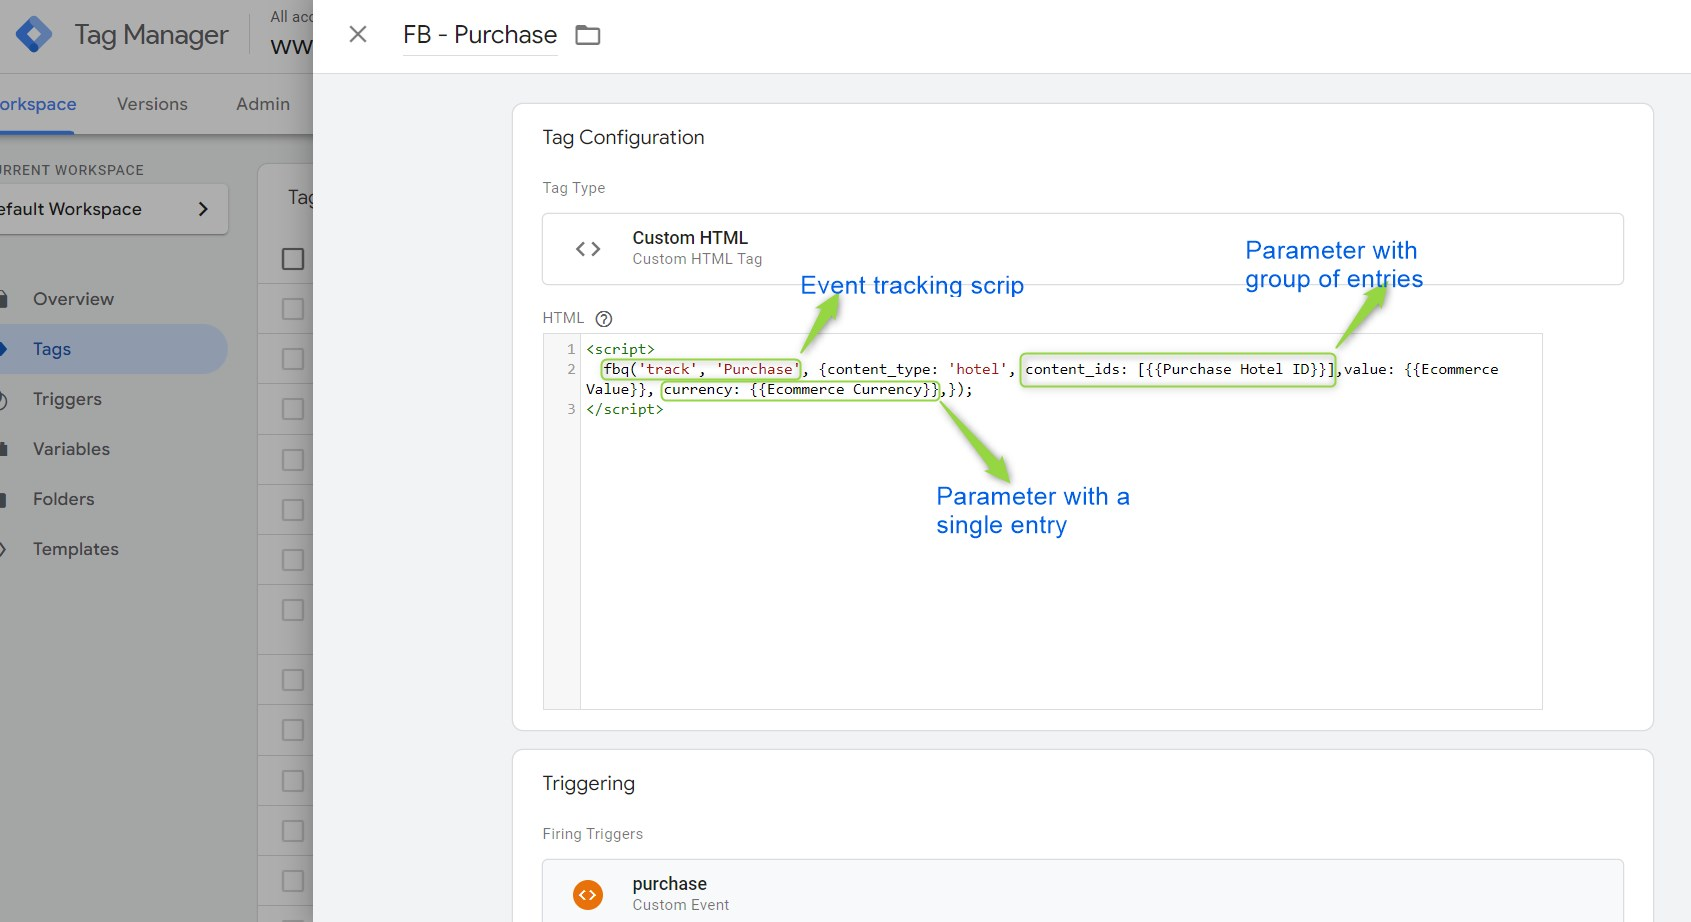
The above code is constructed as per Meta guides for standard pixel events. The first part, which is formed of the fbq(‘track’, ‘Purchase’,) is the part related to sending the event to the Facebook Pixel.
once the bracket { was open, we have to give a value for the content_type parameter. That value can be one of several things based on the nature of your business and the event we are tracking.
For example, when we are tracking a hotel, the parameter value will be set to ‘hotel’, but if we are sending product e-commerce data the parameter’s value will be set to ‘product’ or ‘product-group’ based on the event we are tracking.
If we are tracking an add to cart event, by nature the data we will be sending along with each button click will be specific to one product, and hence the value will be ‘product’.
But, if we are tracking an initiate checkout or purchase event, those types of events are generally associated with more than one product, and hence the value will be set to ‘product-group’.
Once the product_type parameter has been given a value, all the coming parameters are supposed to define the extra aspects of the purchase event.
For example, currency: defines the currency parameter and since the value returned is not constant for each purchase event, we will choose a variable we created previously to fulfill its returned value.
To choose a value from GTM, you should open a double bracket {{ and all the previously created variables will show in a drop-down menu.
please note that you should place a comma after each defined variable and make sure all brackets are closed at the end of your custom HTML code.
The Facebook pixel standard event code must be placed in between opening and closing script tags. <script> </script>
Adding the custom event trigger to our Facebook pixel tag
Below the HTML section in the tag configuration, you shall see another block titled “Triggering”. Click on the circular grey area and choose the purchase custom event trigger, that we have previously configured.
Now let’s save our tag and start debugging.
When you open the debugger, complete a purchase on your website and check the summary section on the left-hand side.
You should see a step called purchase. When you click the purchase step, check the fired tags to make sure your FB- Base Tag has been fired at the right time.
If things are going fine so far, navigate to the variables section to make sure that your variables are reading data from the data layer.
Publishing our Container
Now we have our Facebook pixel-based tag and standard events tags configured. Let’s publish them and see how they work.
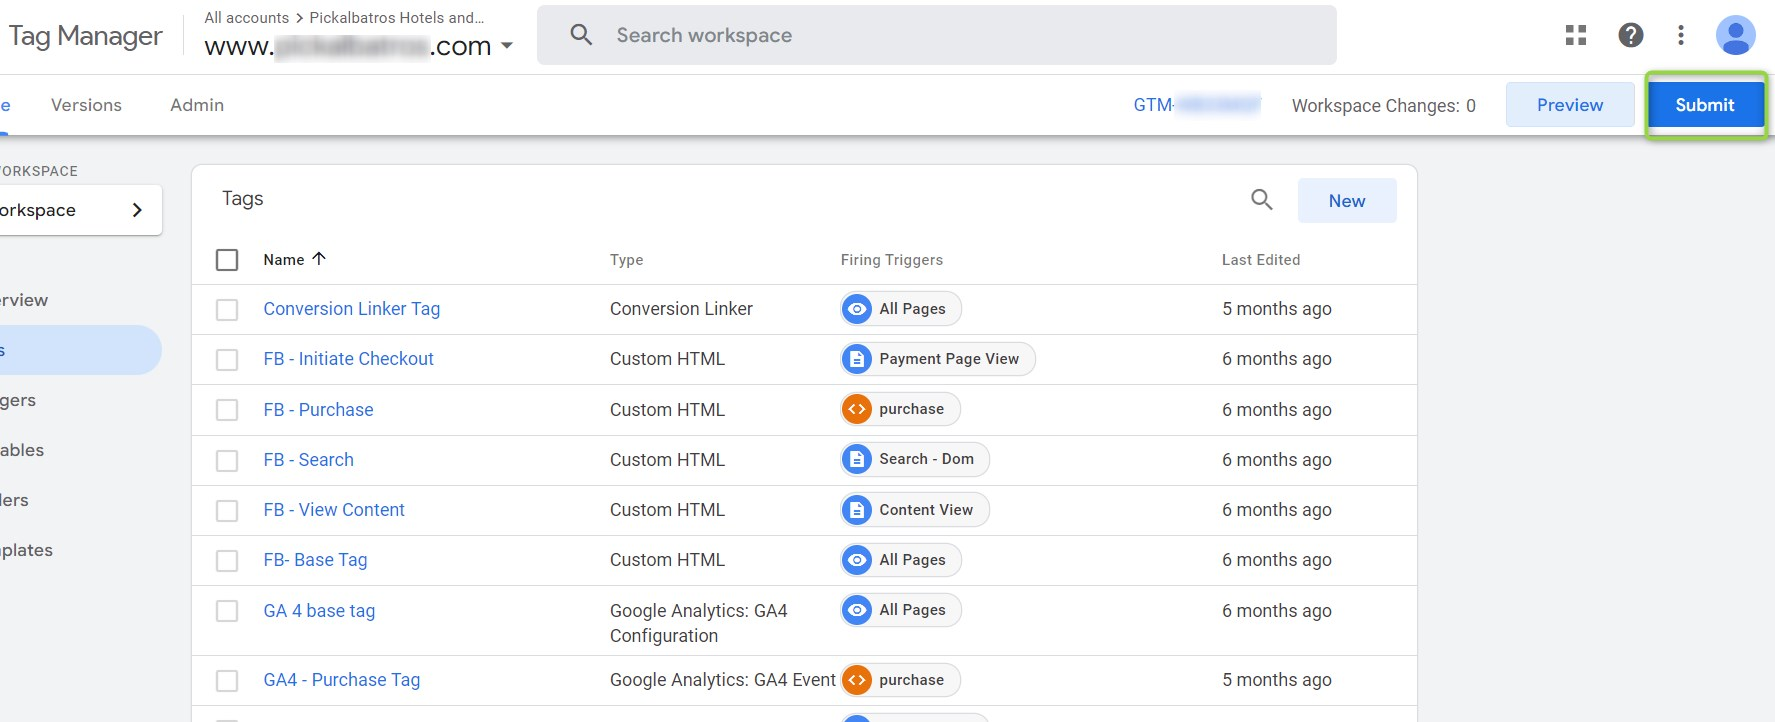
Return to your GTM workspace and click on the submit button.
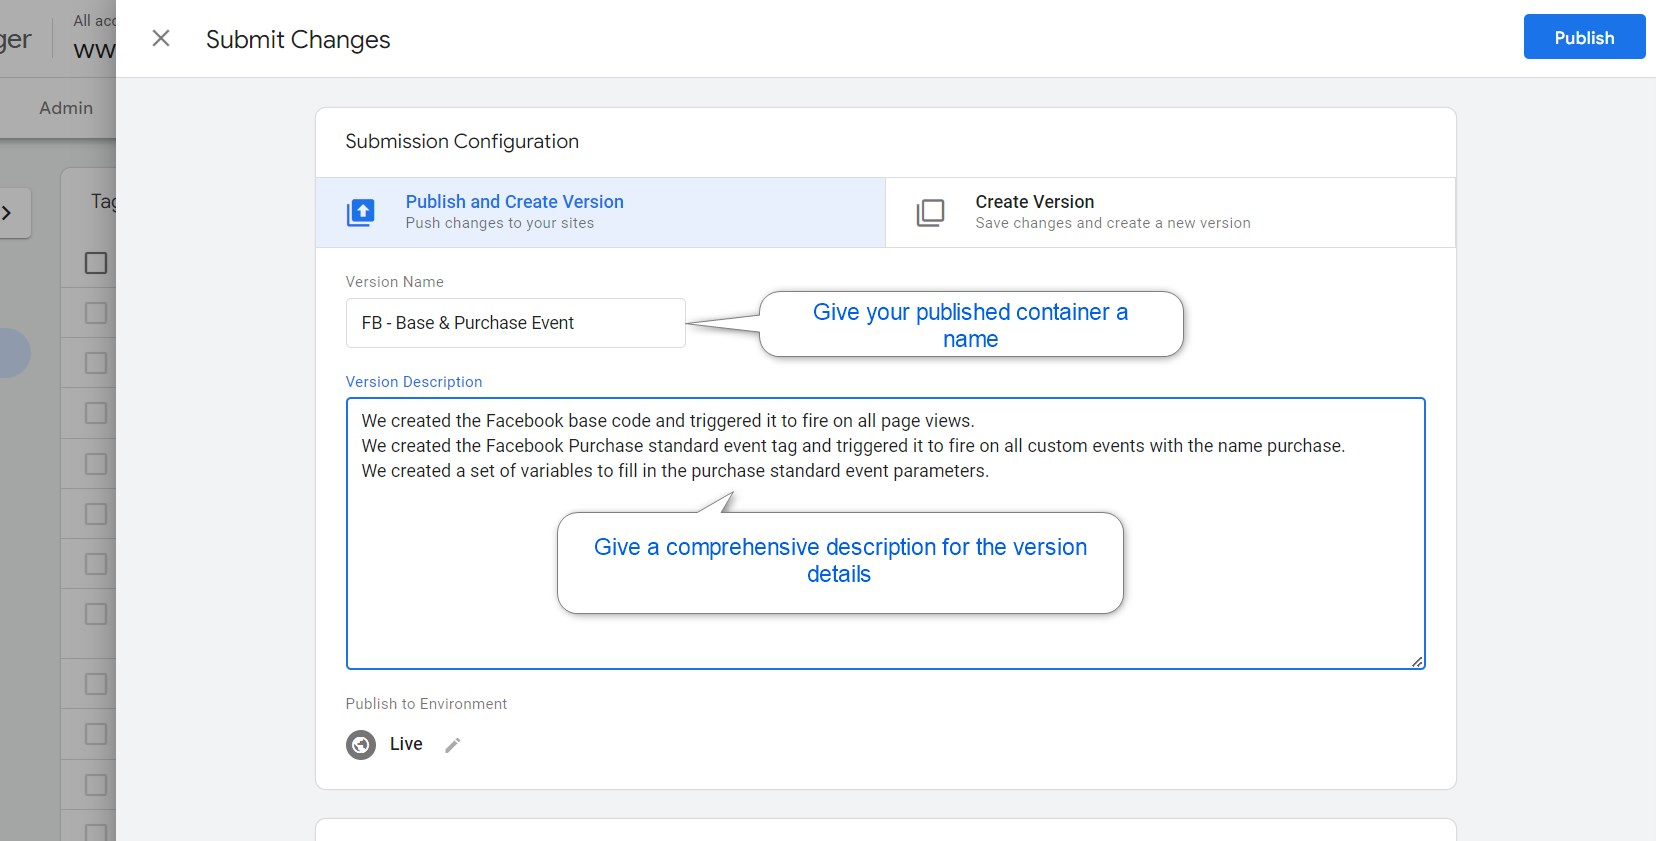
Before publishing your first container, make sure you give your published version a name and a comprehensive description, so you can remember if you had to retrieve it after a later failed trial.
Extra tips
Create A Facebook Pixel ID Constant Variable
Sometimes we might need to switch our Facebook pixel account that is being used to track our website.
If you want to save yourself the trouble of going back to the Facebook pixel base code tag and editing the code once again, you can create a Facebook pixel id constant variable.
Copy the pixel id from your Events manager account, and then paste it inside the value of your constant variable. If things change later and you want to change the tracking account, you can just go back to that variable and update the id and republish your container.
Benefits of Integrating Facebook pixel with Google Tag Manager manually
Fewer Integration errors
Using a Facebook pixel custom template to integrate your pixel with GTM isn’t always the best practice, for several reasons
Templates are created with a specific scenario in mind, that scenario wouldn’t necessarily match yours.
Using a template to add Facebook pixel sometimes lead to errors in the reported data. You won’t always be able to understand where the problem lies.
Facebook pixel integration through GTM manually will teach you how events and parameters work, which will make you better at creating custom parameters and events on the long run
You can track conversions with better accuracy, which will make running Facebook ads more successful and rewarding.
Why is Facebook pixel essential for Ads performance?
Facebook ads manager campaigns have something called a learning process. The longer the ads run and keep delivering impressions, the more results they can get.
The first five days of any campaign running time are considered a learning phase. Account learning, however, is a non-stop process. It starts with account creation and keeps going.
Facebook pixel is an essential part of that process, as it tells your ads manager when a conversion is taken and who made that conversion event.
Each extra conversion taking place helps Facebook define your top converting audience even more.
Not just that, but a Facebook pixel integration provides you with the custom audiences creation feature from the Facebook business suite interface. Creating a custom audience and a lookalike audience has proven to be more effective in terms of maximizing conversions, than the normal prospecting method.
Congratulations on reaching out so far in this blog. I know it’s been too much tech-savvy talk, but you must have come out with an extra skill that will definitely help you further with your career.
If you have any comments or face any problems with your Facebook pixel integration, I am always eager to answer you in the comments.
You can even send me an email and let’s hop on a quick call to see how it can get fixed.